Swing gates are a classic. It is this type of gate that is most often placed on the fencing of private houses and cottages. There are many options for swinging entrance groups. They vary in material, structurally and in other characteristics. Each of them has its own advantages, disadvantages and installation features. But any swing systems must carry two essential functions: to ensure the particularity and safety of the site, as well as to be its decoration.
Swing Gate Design
Modern construction is new materials, finishes and design methods. But no matter how the gates look, the principle of their arrangement has not changed. Structurally, they are performed from:
- racks. In principle, the pillars are not part of the gate, but fastening the canvas without them is impossible,
- frames. This part of the construction may be metal or wood. Most often they choose a frame made of metal so that it has greater rigidity and lasts longer,
- sheathing material
- accessories: canopies, locks, latches.
These elements are unchanged for any structure. At the same time, depending on the type of gate, their shape and functionality are slightly different. That is why it is necessary to determine the type of structure before starting work. Which gate is better to choose depends on how often and under what conditions they will be operated.
Single leaf
In fact, single-leaf structures are one continuous web. Not so often, the owners of the plots choose this option, because their good functioning requires extremely reliable strengthening of the pillar, and this is costly both financially and in time. If such gates are garage, then their frame should be very powerful, metal, and the hinges should be reinforced. They can only be set if there is sufficient space for closing / opening.

Bivalve
Bivalve structures are the most popular: they are installed most often, they are convenient to use, and they are reliable. To make and put such a gate yourself is not at all difficult. Structurally, these are two identical paintings, a two-frame frame and a sheathing in the form of sheet material. To open the sash, much less space is required than in the case of single-leaf.

How to make a swing gate with your own hands
Before embarking on the design and construction of the gate itself, it is important to decide on the material from which they will be made. As mentioned earlier, it all depends on the taste and financial capabilities of the owner. For the canvas, wood, steel and profiled sheets, a metal fence, polycarbonate, even forged products are suitable.
To independently and accurately make swing gates yourself, you need to prepare a drawing. At this stage, it is important to clearly determine the dimensions of the projected group. Such a solution ultimately determines its total mass and the distance that will subsequently be required to open the sashes. It is better to take standard dimensions as a basis, where the height and length of the wings are from two to two and a half meters. And when calculating the free space, it should be borne in mind that it should be approximately one and a half times larger than the width of the allocated opening.
At the design stage, the presence of reinforcement and stiffeners should be taken into account immediately. This will ensure a long service life.
Below are some drawing options.

Tool and material
When the drawing of the future gate is ready, it is time to start building.
For the manufacture of the structure, the following tool is required:
- grinders and discs - threaded, grinding,
- welding machine and set of electrodes,
- roulettes
- level
- corner
- a hammer
- shovels and trowel.
An auxiliary tool will also be useful: a compressor, paint brushes or spray guns, a drill and riveter with rivets.
Listed below is the required amount of materials for the construction of swing gates.
- To make a frame, you need a profile pipe. Depending on the type of finishing material chosen and taking into account the wind load, its dimensions can be 60 × 40 × 1.5 mm or 40 × 20 × 1.5 mm.
A similar pipe is needed on the racks. It should be chosen, taking into account the weight of the structure. If it does not exceed one hundred and fifty kilograms, then the pipe can be taken 80 × 80 × 4 mm, for gates up to three hundred kilograms - 100 × 100 × 5 mm, gates above this weight require a rack from the pipe with dimensions of 140 × 104 × 5 mm.
The role of the rack can be performed by a concrete or brick pillar, the main thing is the ability of the material to withstand the corresponding load.
- Adjustable or unregulated loops.
- Mechanical or electromechanical locking systems.
- Paint and varnish compositions for covering racks, covering.
- Any kind of skin.
- Automation. Elements of the system can be installed immediately or after some time.
Pillar Installation
To organize the support posts, profile pipes are usually used. Also popular are options such as pouring concrete mortar, wooden beams, channels, brickwork.
The stages of organizing the support pillars look standard.
- In order to correctly choose the place of installation of the supports, it is necessary to measure the entrance opening between both ends of the fence and put marks.
- Dig a hole under the pillars with a depth of about a meter and a diameter of one hundred millimeters more than the diameter of the rack and install the posts. If you deepen the racks into the ground by less than a meter, then in the winter season there is a high probability of their displacement along the vertical axis, which is associated with freezing of the soil and the effect of heaving forces. The result is a violation not only of the stability of the supports, but also the deformation of the entire door structure.
- The support should be adjusted in level, but before that - pour crushed stone to the bottom.
- When the poles are installed evenly and level, concrete them, but pre-cover their base in the pit with brick.

The main stages of the manufacture of leafs for gates
When performing work, you should constantly pay attention to the drawings and schemes of swing gates prepared in advance. Then it’s just not possible to make a mistake with the sizes, extra building materials and time for alteration will not be spent. When making a frame, it is necessary to clearly measure its dimensions, they must correspond to the values of the sheathing sheets. For garage doors, it is better to make two frames - for the external and internal openings, connect them by welding.
The phased production of the valves occurs in the following order.
- Corners and a profile pipe must be welded together according to the scheme, after laying them out on a flat surface.
- To make the structure stronger, the wings are reinforced with diagonal beams.
- The frame is ready, and you can begin to trim. A two-millimeter metal sheet of corrugated board is suitable for this. Thicker sheets require reinforcing supports. Sheathing can also be made of wood.
- It is very important to pay great attention to the installation of loops.
- At the end of the operation, the locking mechanism cuts in and the gate is installed. The drawing of the gate and the manufacturing process have the same principle as for the main frame.
- Coating with varnish or paint is carried out before the installation of the gate or already in limbo.
- The last step is the installation of an automated system.
Hinge welding
Particular care should be taken in the selection of hinges and their welding. Despite the small size of this element, its importance is too great. It is the hinges that hold the entire structure. Do not save on their purchase. Choose better quality. The loop is welded on one side to the frame, and the other to the support. Work must be done in good faith, otherwise there is a risk of a very unreliable design. If the stand is brick, then the hinges are welded to the channel, fixed with a dowel.
Frame cladding
To perform the cladding, profiled sheets are stacked on top of the frame frame. The sheet is attached to the frame with rivets or self-tapping screws. Ten mounts per square meter is enough.
After the lining is completed, you can hang the sash.
Sheathing can also be made of wood, sheet metal, steel mesh, be forged, from the netting and combined.
Benefits of automatic swing gates
For ease of operation, you can install a system of automatic door opening.
Automatic garage swing gates simplify and make it safer to enter the garage or car yard. Their advantages are obvious. Thanks to the automatic swing gate operator, you can close and open the doors without leaving your home or car interior. Such convenience is especially invaluable in the winter and in bad weather.
DIY automation installation
Automation for swing gates, if desired, can be done with your own hands. It is not so simple, it is advisable to have some experience in carrying out such work. A mistake in such a situation is fraught with serious costs, because the required equipment is not cheap. But in case of success, the owner can count on an average for a 50-thousandth cycle of opening and closing the valves.
Automatic equipment is applicable for various types of door structures: sliding, swing, garage and so on. Given the specifics of each of them, the most acceptable option is to install such systems specifically on swing gates. The main advantages of this type of entrance group are the simplicity and convenience of opening / closing, as well as the lack of need for a large space. It is these facts that determine the popularity of their automation.
Automatic drives are linear and lever. Depending on the interval between the canvas and the outer edge of the column, one or another type is chosen. In the automation diagram for swing gates, the distance is indicated by M.

If the designated size does not exceed 150 mm, then you can set the linear system, if more - lever.
To equip the door group with an automatic drive, you will need the following components:
- bicycle bearing unit
- a plug for "blind" closing holes,
- a profile that will play the role of a guide,
- rolling rollers
- motor (you can use spare parts from an unnecessary washing machine),
- jack,
- catchers.
On the swing gates, any type of drive automation is installed on the U-shaped brackets, which are welded to the posts. Such brackets are the provision of a movable connection.
The axis of rotation should be eight- or ten-millimeter red-hot bolts.
Installation is carried out in the following order.
- First of all, it should be ensured that the electric motor and the lever are installed down along the upper edge of the blade.
- The mechanism is first attached to the support, and only after - to the wings.
- When the system is mounted, you must open it manually and adjust the limit switches.
- The system is connected to the mains in the locked state of the drive.
- In the end, you need to check the smoothness of the opening and the reliability of the system.
Making and installing swing gates with your own hands is not at all difficult. The main thing is the availability of the necessary tools and materials. In addition, patience, attentiveness and at least a week of time will be required. But the beautiful and reliable gate will serve the owner for many years.
Description and types of swing gates
The principle of swing gates has remained unchanged for many years. For the manufacture of gates, not only traditional materials (wood and metal sheets) are used, but more modern ones - corrugated board and polycarbonate.
The leaf opening mechanism has been improved, and today many gates are equipped with a high-tech automated system, making operation more convenient and practical.
The advantages of swing gates include:
- simplicity of design
- long service life
- universality - swing gates are installed on the territory of industrial enterprises, office buildings, private plots, in hangars, garages and storage rooms with any type of opening,

- the width of the wings can reach 15 meters, which allows you to cover large openings in hangars and industrial facilities,
- low cost of manufacture and installation - the installation of swing gates can be done independently, without the help of specialists,
- swing gates practically do not require additional maintenance during operation.

Classic swing gates consist of two wings, which are attached to the supporting posts. Sashes move in one or two directions, swinging open the gates in or out.
The only drawback of using swing gates is the need for a large space for opening the wings. The area around the gate will constantly have to be cleaned from snow and stones.
The door leafs do not adjoin one another tightly, therefore, due to the low thermal insulation, swing gates are not used in heated rooms
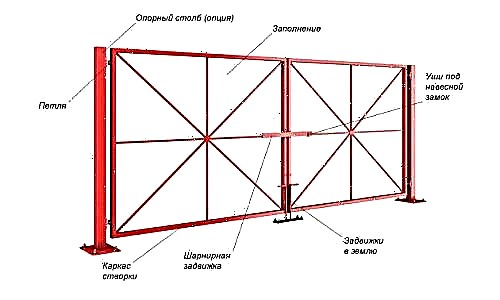
The main structural elements of the swing gates: sashes and installed filling, support posts, hinges, bolts and stops.
By type of device, swing gates are:
- Bisexual (on two wings) or with one hollow.
- Combined gates with a built-in gate (often installed in garages, in small summer cottages or storage rooms) save space for a separate entrance. Gates with a separate entrance are more convenient, the gate is designed as a "deaf" element.
By type of design:
- One-way gates - gate leaves are decoratively decorated only from the outside.
- Swing gates on two sides - the gate leaves have an aesthetic appearance on both sides (art forging).

According to the material of manufacture:
- Wooden swing gates.
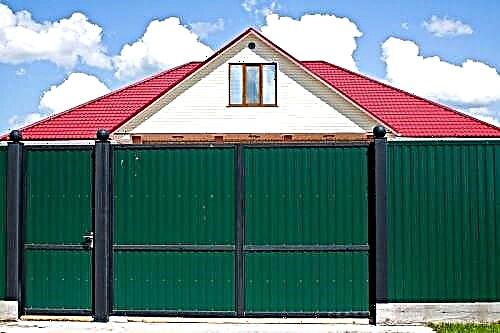
- Metal swing gates made of smooth metal canvases or profiled sheets.
- Gates made of polycarbonate.
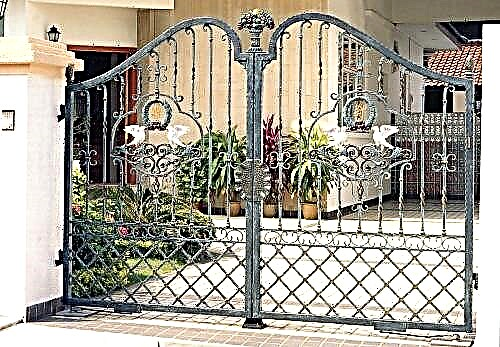
- Forged swing gates.
Swing gates: photos
Before you start making swing gates with your own hands, you need to choose the right material to fill the wings.
Selection of material for swing gates
The choice of material depends on the purpose of the gate, the architectural direction and design of the swing gates.
The principle of creating swing gates made of wood or metal is practically no different. The characteristics of the finished product and some technological features of the processing of wood and metal sheets depend on the change of material.
Here are some recommendations for choosing the material for the “sheathing” of swing gates:
- If you plan to install automation, then you need to choose light materials (corrugated board, polycarbonate) so that the sashes can easily open and close.

- Wooden gates look beautiful, but are considered less durable. In order for the gate design to serve for a long time and without interruption, it is better to choose wood that is resistant to external factors, for example, oak.
- The combination of metal strength and sophistication of wood is the best option for swing gates on a personal plot. The frame of the gate can be made of a metal profile, and the doors can be “sheathed” with wood or, more practical, with a wood-polymer composite.
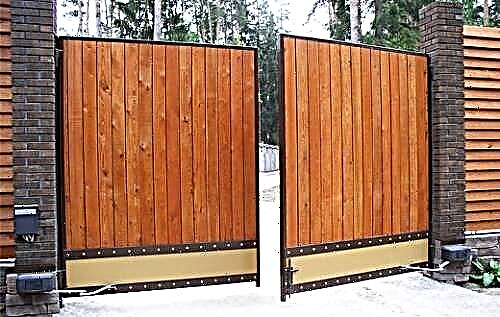
- Wooden gates need additional maintenance. The wood must be treated with a hydrophobic composition, a paint and varnish material and antifungal impregnation.
- Wooden gates complemented by forged inserts look aristocratic. However, the price of swing gates with art forging elements is significantly higher than the cost of conventional gates made from profiled metal sheet or sandwich panels.
- Very popular in the manufacture of swing gates - professional sheet. The material has many advantages:
- light weight (the ability to install automation),
- a wide selection of relief (sheets differ in wave height) and colors (you can choose a color that mimics natural stone or wood),
- material availability - the price per 1 m2 of profiled wall sheet is about 250-300 rubles,
- practicality and durability
- convenience in work.


Let's consider in detail how to make swing gates from a profiled sheet.
Design Features
Swing gates - a classic design for garages located next to residential areas or in suburban areas. The list of features and benefits of swing structures include the following:
- The design provides reliable protection against unauthorized entry in the event of the construction of a door made of thick metal with additional stiffeners.
- Sashes are very easy to open and close. The opening angle may vary depending on the type of hinges used.
- Installation does not require special training. For installation it is enough to pre-prepare the circuit and sequentially perform a series of actions.
- The use of an additional insulating layer allows you to make the room warm in order to use it as a workshop.
- The hinged structure is characterized by a long period of operation and resistance to external influences.
Drawing up and dimensioning
Before directly performing installation work, it is required to prepare a drawing and calculate the dimensions of the structure. Dimensions are determined based on the width of the garage itself and the car. In doing so, the following recommendations should be considered:
- The minimum distance between the frame and the car body is 30 cm on each side. A shorter gap increases the risk of damage to the machine, while increasing the distance provides a more comfortable ride.
- The standard width of the structure varies from 2.5 to 3 m. A gap of at least 0.8 m is left between the perpendicular wall and the frame.
- The height of the gate on the diagram is marked within 2-2.2 m. It is recommended that minibus owners leave an opening with a height of 2.5 m or more.
- If you want to install a gate with a built-in gate, you must determine which of the wings it will be mounted on.

We select materials
The next step after preparing the drawings is the selection of the necessary materials. The design can be made of sandwich panels or thickened metal sheets. The second option is more expensive, but these designs are characterized by increased strength and low weight, which simplifies the installation process. Multilayer sandwich panels have a large mass due to additional insulation and thickness.
When choosing a material, it is necessary to determine the appropriate thickness of the metal. The thicker the iron gates, the greater the total mass of the structure. Most often, garage owners choose sheet steel 1.5-3 mm thick. A frame made of steel 6.5 cm thick is required for the frame. The frame is made of thinner sheets, so a corner or profile 5 cm thick is enough for it.

What tools will be required
To install a steel structure will require a certain list of tools and fixtures. Having planned independent installation of the structure, it is necessary to prepare:
- tape measure, building level and marker for taking measurements and marking,
- grinder for carving material,
- hammer drill
- elbow
- welding machine,
- spray gun or paint brush for processing sashes.

Frame manufacturing
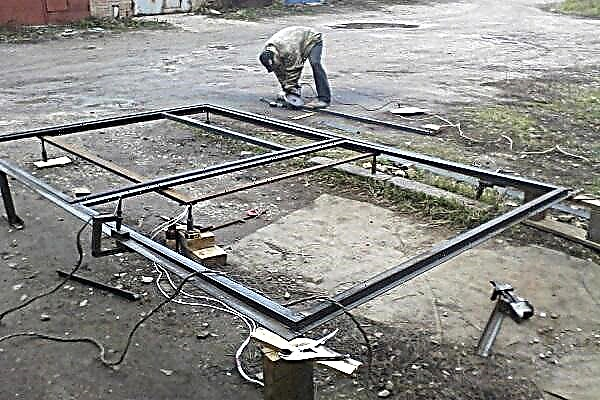
Before proceeding with the manufacture of the frame, it is important to find a suitable workplace. The surface of the working space should be smooth, and the scale is larger than the dimensions of the structure per meter on all sides. It is allowed to carry out work by fixing dense material on brick posts. Frame creation begins after the erection of the front wall.

The metal frame is mounted from the external and internal components. First, 8 parts are cut from a metal corner, one half of which is equal to the height, and the second to the width of the entrance opening. The resulting workpiece is laid out on a flat surface for measuring angles.
If each part has a right angle, it is necessary to connect the elements using a weld, laying on top of each other. If a violation of the angle occurs during welding, it is possible to correct the error with a lever made of scraps. In problem areas, corners are additionally welded. After elimination of the defects, grinding is carried out to ensure a snug fit of the wings.
Cloth and power loops
The main element of the swing gates is the canvas, which consists of two wings. A sheet of metal sheets is mounted on a profile frame. The process of preparing the canvas requires the following steps:
- The sheet of metal is marked according to the specific dimensions of the wings. The left wing should be 10-20 mm wider to overlap.
- Sashes are cut with a grinder and welded to the frame from the bottom for preliminary fixation.
- When the wings are aligned, it is necessary to fix them by welding along the entire perimeter. So that during the working process the blades do not move, it is recommended to start welding from the corners.
- After welding the elements, hinges are required.

Hinges and door locks
Locking hinges for gates must be purchased and prepared in advance. Hinges consist of two parts. One part is mounted on the cylinder and provides the ability to rotate the structure. The second part performs the function of fasteners. To install the gate you need 4 hinges. When using a design with increased weight and large dimensions, you can increase the number of fasteners to 6.
During installation, the lower part of the hinges is welded to the outside of the frame, and the upper element is fixed on the back side. To increase the fastening strength, it is allowed to weld on each side of the loop in a metal strip.

We carry out installation work with our own hands
Having prepared all the components of the swing gates, you can proceed to their installation in a permanent place. First, the installation of the outer and inner frame. The structure is installed in the opening and the coincidence of vertical and horizontal lines is verified, and then fastened to each other. To fasten the elements, strips of metal with a width of about 4 cm are used, which are fixed with a distance of 60 cm.
The next step is the design of the front wall of the room. The free space formed between the frames is filled with bricks. To securely fix the frames in the opening, reinforcing rods of about 25 cm length are used. One edge is fixed on a metal frame, and the rest is walled up in a brick wall. The upper part of the frame is covered with a concrete or steel beam.
If necessary, provide additional protection garage doors are equipped with locks. The best option is a lock, the pins of which diverge in 3 directions and fasten the wings not only between each other, but also provide fixation to the ceiling and base.

Garage insulation
During the installation process, it is recommended to equip the swing gates with a heat-insulating layer in order to maintain a higher temperature indoors and to extend the operational period of the structure. Correctly mounted door trim provides a reduction in heat loss of up to 60%.
There are several different ways to finish the structure. The most common insulation material is expanded polystyrene extruded sheets, which are suitable for internal and external cladding.
The material is evenly distributed inside the frame and covered with plywood sheet or wooden lining. It is not recommended to use budgetary cotton materials as an insulating material, since they lose their initial characteristics in a short period.

During sheathing, it is important to ensure that there are no air gaps between the thermal insulation layer and the metal structure, as this will increase heat loss. For high-quality insulation, the layer of internal material must have a thickness of more than 15 cm.
Having completed the procedure for warming swing gates, you should give the finished design an attractive appearance. To do this, it is enough to treat the coating with paintwork material. First, the welding residues are removed from the gate, after which they are primed and painted.
What are swing gates

Before you start implementing the idea, you must clearly understand what swing gates are, what elements they consist of and how they work. There are two types of this design:
The first option is not suitable for the garage, since the dimensions of one leaf will be too large, and it will be inconvenient to open it.
Bivalves consist of several elements:
- frame made of metal corner, round or profiled pipe,
- sash
- gates in one of the wings, if such is provided by the project,
- loops
- jib / crossbeams / lintels,
- deadbolt and / or lock.
Assembly and installation of swing gates is simple. But those who do not have experience in the manufacture and installation of such structures will need detailed instructions that take into account all the nuances of each stage of work.
Advantages and disadvantages
The main advantage of swing gates is reliability. But this is far from their only plus. Simplicity of design leads to other advantages:
- no need to configure and maintain automation,
- Among the budget alternatives for sectional, overhead and retractable gates there are no comparable in price to swing - the latter are always more profitable in price,
- automation can be installed: drives that open and close the doors,
- there is no need to strengthen the opening and the upper ceiling, which is often required when installing sectional or overhead gates,
- the possibility of warming the wings and frame,
- many casement design options.
The main disadvantage is the need to get out of the car and close / open the gate in any, the most adverse weather conditions. In addition, in winter it is necessary to clear the space in front of them of snow.
What materials can be made
Despite the wide selection of building materials, reliable swing gates can be made in several ways.
Option number 1:
- Metal corner 50x50z3 mm - for the manufacture of the frame of the sash and reinforcing it beams or crossbars.
- Sheets of cold-rolled metal 2.5-3 mm thick. Attached to the frame with a release of 3 cm. Welding is used.
- 4 loops with a cross section of 25 mm, dimensions 30x160 mm. Welded onto metal sheets through additional metal plates.
Option number 2:
- Rectangular pipe 40x40x2.5 mm or 50-50-2.5 mm for the casing frame and reinforcing elements.
- Sheets of metal 1.5-2 mm thick are fixed to the frame with rivets.
- 4-6 loops.
- 4 metal plates for hinges.
To install the goalposts, pipes of 80x80x3 mm are used. The upper beam reinforcing the opening is made of channel No. 16 (shelf height 160 mm) or No. 18, depending on the width of the gate. The threshold can be made of the same materials: a profile pipe or a metal corner.
The most reliable way to install swing gates in the garage is to mount a frame from channel # 24 under them and install it at the stage of building walls and ceilings. If this is not possible, mount elements reinforcing the opening: the upper beam, the threshold and the struts for the wings.
Reference! The proposed materials for the installation of swing gates in the garage are universal and suitable for any building: brick, concrete, wood, foam and gas blocks. The only exception is the metal profile garage. For such buildings, lightweight structures are needed.
For garages, metal gates are made of "metal" profiles, such that each leaf can be pressed against the opening with minimal effort. The frame of such structures consists of a bent profile of an open section (g- or p-shaped). Sashes are installed on 4-6 loops.
Gates with a rigid frame are designed and manufactured in such a way that the shutters fit the opening with a minimum gap and immediately close with the provided locks, without additional efforts. Accurate data on the required materials in a particular case can be obtained through calculations.
Payment

A professional calculation of the strength characteristics and geometric parameters of materials for the manufacture of garage doors is performed using a complex of complex mathematical formulas. The following factors are considered:
- opening stiffness
- deplanning deformations for given sash sizes and the use of a certain material,
- bending strength
- torsional forces (from wind pressure, weight load, mechanical stress).
To perform accurate calculations, specialized calculators have been developed. If necessary, you can use them.
Materials
- A metal corner 50x50x2 mm 2.2 m long - 2 pcs (a total of 4.4 m corners will be required).
- Profile pipe 50x25x2 mm 3 m long - 2 pcs.
- Sheets of cold-rolled metal (can be replaced by hot-rolled) 1250x2500 mm, 2 or 3 mm thick - 3 pcs.
- Profile pipe 40x25 mm (or 40x20 mm) 2.2 m long - 9 pcs. (Necessary for the manufacture of horizontal slats and gates).
- Profile pipe 40x20 mm 3 m long - 3 pcs (for the manufacture of vertical slats of the sash frame).
- Profile pipe 40x40 mm 3 m long - 1 pc (for mounting a vertical bar at the junction of the working flaps, it also forms holes for the lock and bolts)
- Additional elements: steel plates for hinges and to strengthen the joints of the frame, steel bars.
- The castle is level.
- Garage bolts: vertical and horizontal.
- Primer for metal.
- Solvent No. 646.
- Paint.
- A piece of chalk.
- Insulating tape.
- Large and medium grit sandpaper.
Reference! Using a profile pipe threshold for a device is a reasonable solution. With this design, the door leaf frames are raised above the parking area coverage by 20–25 mm. In this regard, rainwater will not leak into the room.
Tools
- Welding machine.
- Electrodes
- Sledgehammer, hammers.
- Grinder, wheels for metal.
- Drill, drill.
- Hammer drill.
- Screwdriwer set.
- Bolts with nuts, self-tapping screws.
- Clamps.
- Level (preferably laser).
- Roulette or rangefinder.
Important! Before you start working with the welding machine, you must make sure that the garage wiring can withstand this load.
When calculating and purchasing materials, the need for tying (double frame with horizontal jumpers) of the garage opening is taken into account. For its manufacture and installation will require the same materials and tools. You can use a metal corner, channel, profile pipes. The harness is an optional element of the gate device, it is necessary in order to strengthen the opening and the structure as a whole.
Fixtures
To perform the cutting and assembly work, two tables are required: the main and auxiliary. The dimensions of the main one must be such that both wings with frames fit on it. The surface of the table must be set according to the level. Otherwise, the risk of distortions is high. The table must be durable, able to withstand the weight of metal, tools and sledgehammer.
Preparatory work

The preparation of the opening consists in performing several actions:
- Make sure that the walls on either side of the opening have no cracks or deformations.
- Dismantle the old structure, if any.
- Level the opening (if necessary).
- They clean surfaces from dirt, layers of cement and plaster.
Step-by-step instructions for the manufacture of metal swing gates
There are two ways to install metal swing gates for a garage.
Option number 1:

Step 1. Cutting materials: grinder cut corners and pipes of the desired size, corresponding to the drawing or project.
Step 2. Assembling a double frame.
- Two vertical strips, the length of which corresponds to the height of the gate, are connected by a welding method with horizontal jumpers (steel strips).
- In the wall of the opening, holes are drilled for the clamps, which can be used as pins from the reinforcement. The minimum hole depth is 200 mm.
- Dust off the holes.
- Fill them with cement-sand mortar.
- With the help of a sledgehammer, the pins are driven.
- On the protruding part of the pins, measure 50 mm and grinder cut off excess. There is another option for this task: they cut the pins flush with the frame, scald them after installing it.
- Fit the frame.
- The protruding parts of the reinforcement are bent with a sledgehammer.
Installation work is performed using a plumb line and level. In a similar manner, a second vertical frame post is mounted.
Step 3. The horizontal layout for the installation of the upper beam and threshold. When performing work using the laser level.
Step 4. According to the instructions given in step No. 2, the horizontal beams of the frame are mounted.
Step 5. The frame of both wings is assembled on the table. Do not forget about the need for reinforcing bars, which can be arranged x-shaped, t-shaped or on the principle of horizontal jumpers. If a gate is provided, its frame is welded from the corresponding elements.
Step 6. Weld the hinges.
Step 7. Hang the wings.
Step 8. Weld sheets of metal (sash the sash).
- Sheets for sheathing should be at least 20 mm higher and lower.
- The center should be covered by an overlap of one of the wings.
Step 9. They clean the metal from the effects of welding.
Step 10. Coat with anti-corrosion primer.
Step 11. Install locks and locks.
Step 12. Paint the gate.
If necessary, warm the cusps and the opening.
Option number 2:
This method of manufacturing the sash frame is optimal in situations where it is not possible to build a perfectly flat horizontal surface for assembly of the frame.
Step 1. Production of scarves. 4 identical strips 50 cm long are cut from a metal corner. At several points they grab them to the frame of the opening. A headscarf is an auxiliary element that will subsequently be cut off by a grinder. Therefore, continuous welding is not required.
Step 2. Cut 4 strips to make the sash frame.
Step 3. The corners prepared at the previous stage are welded to the kerchiefs so that the “frame in frame” design is obtained. Continuous welding is needed only in the corners of the inner (for the wings).
Step 4. Installation of stiffeners. If a gate is provided in one of the wings, its frame is welded.
Step 5. Installation of canopies / loops. Use products with the connection of the "father-mother" type. “Papa” is fixed to the frame of the opening, “Mom” is fixed to the gate wings.
Step 6. A grinder cuts the sash frame vertically in the middle.
Step 7. Cut off the scarves.
Step 8. Sheath the flaps with sheets of metal or other material selected at the design stage.
Features of care and maintenance
Properly manufactured and installed swing gates have a large margin of safety. In order to ensure that their operational resource is not prematurely exhausted, it is necessary to observe several simple service rules.
- Keep your metalwork clean.
- Timely update the protective paintwork.
- Avoid mechanical damage to the skin: dents and chips.
- Do not clean painted structural elements with scrapers, bristles with bristles, washes and solvents.
- Before opening / closing the sashes, make sure that there are no obstacles in the way of their movement.
- Do not allow weight loads on the gate leaves.
- The loops are periodically lubricated with Litol or another similar product.
The process of making swing gates in the garage is not as complicated as it might seem at first glance. All stages of the implementation of this task, from design to painting the finished structure, can be done with your own hands. This will significantly reduce the cost of the garage improvement.
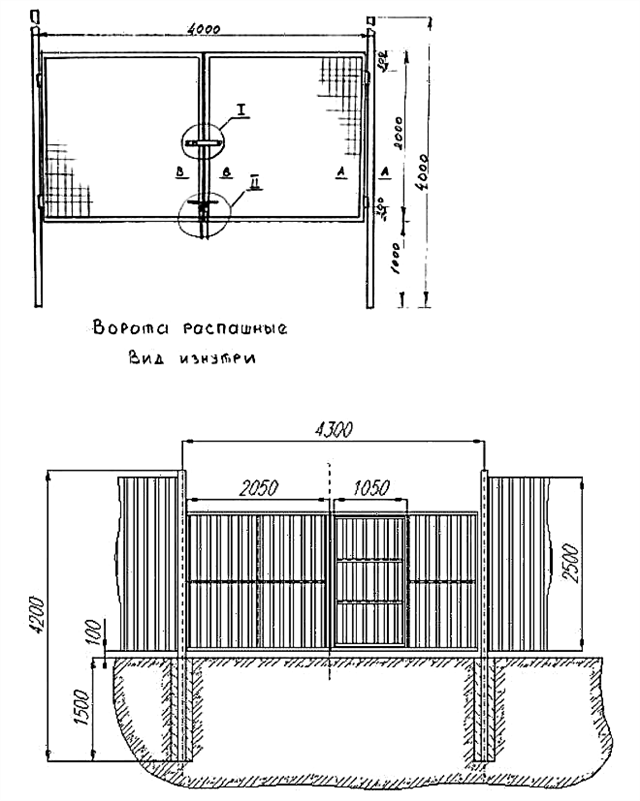
Swing gate drawing
In the drawing, it is necessary to indicate the dimensions of the swing gates and the location of the main structural elements. When planning the length of the gate leaves, it is necessary to take into account the width of the carriageway and the type of vehicles under which the gates are mounted.
The gate is considered to be optimal at a height of about 2 meters and a length of each wing of 2 meters

Gate leaves can have one or two horizontal rungs - stiffeners reinforcing the structure.

As a reinforcement, two diagonal and one transverse crossbeams can be used. This arrangement gives structural strength and maintains the geometry of the gate.
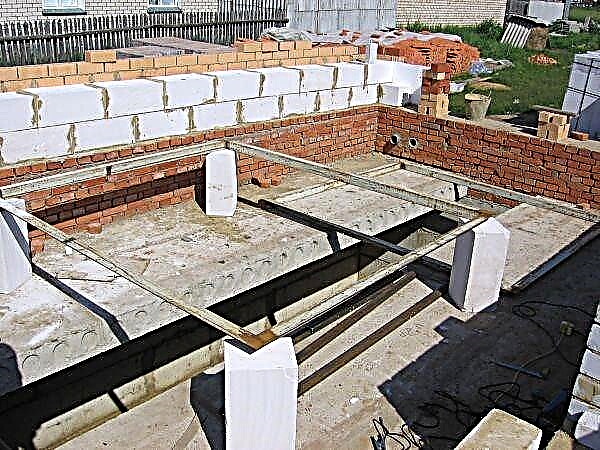
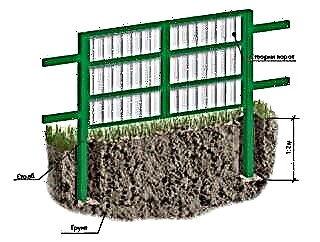
Mounting support poles
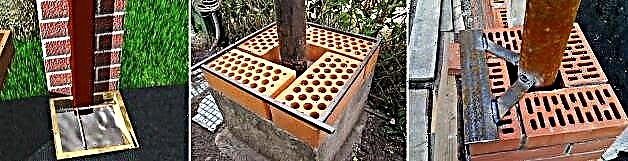
The installation of swing gates begins with the installation of support poles. In this case, metal pipes will be used as pillars. Alternatively, a wooden beam, concrete or brick pillar can serve as a support.
A pipe or channel is necessarily laid in the middle of a brick pillar, mortgages are removed from a steel corner or reinforcement for fastening the racks with loops.
A metal pillar is concreted to a depth of at least 1 meter (the depth of freezing of the soil), under a brick - a reinforced foundation is laid to a depth of 1 meter
The order of installation of support columns from pipes:
- To clean a pipe from rust, to degrease solvent or gasoline.
- Primer the pipe and paint it in one tone with the selected professional sheet.
- Measure the width of the gate and dig two pits 1-1.5 meters deep.
- Sprinkle the bottom of the pits with sand and gravel (the thickness of the half is about 20-30 cm).
- Install the support post in the pit and strengthen with reinforcement.

- Use the building level to align the pillars.
- Fill the pit with concrete (cement + slate sand + crushed stone of fine fraction).
- Concreted foundation leave to harden for at least a week. If the gate leaves are heavy with forged elements, the foundation should “stand” for two weeks.

While the concrete is "seized", it is possible to start manufacturing the door leaf - the frame and its casing.
Swing gate frame
It is necessary to prepare the site on which the frame for swing gates will be made. The minimum size of the platform is the size of one sash plus 50 cm on each side. It is desirable that the workplace is located near the installed support poles.
The sequence of manufacturing the frame for the gate:
- Clean, degrease, prime and paint the pipe for the frame.
- Standard flaps are rectangular, but there are exceptions - square and curly. If the top of the gate according to the drawing has a rounded shape, then the pipe will have to be bent. It is difficult to do it yourself, therefore, to give the frame the desired shape, it is better to contact professionals.
- The pipe is cut in accordance with the dimensions indicated on the drawing, the cut angle is 45 ° C.
- Put the prepared crossbars on the workplace. Check the evenness of the diagonals using a tape measure.
- Grab the frame by welding.
- Check the evenness of the angles and diagonals again, if necessary, trim and boil the pipes completely.
- On the inside of the frame, weld a corner. The joints between the corners should be made at an angle of 45 ° C.
- At the corners of the frame, weld “scarves” - these will give extra strength and evenness to the frame.
- Prepare the crossbeams and weld them to the frame. Typically, horizontal stiffeners are welded at a distance of 40-50 cm from the lower and upper edges of the sash.
- At this stage, you can make a sheet metal box for the lock - it will protect the locking mechanism from rain and snow.
- The position of the plumb lines should be “moved" from the support posts to the side racks of the frame.
- Attach the mates of the canopies.
- Sand the weld points, primer and paint.


Automation criteria for swing gates
Design engineers have modernized the management of entrance and garage swing gates by developing linear and lever electric drives.
Linear drive - The most common type of automation of swing gates (about 95%). The drive works on the principle of shortening and lengthening the stem.
Linear actuators have gained popularity due to their advantages:
- simple construction
- reliability of work
- affordable cost.
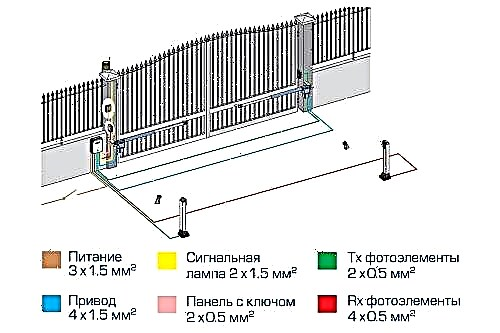
The linear automatic system kit includes:
- linear electric drives - 2 pcs.,
- Control block,
- signal lamp
- electromagnetic lock,
- antenna.
Operating principle lever drive, like a human hand - the lever consists of two parts connected by a movable hinge.
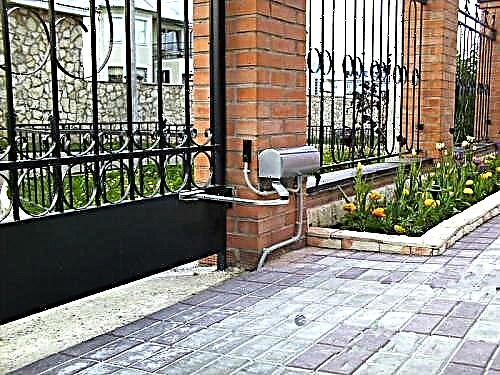
Lever actuators are inferior to linear ones in terms of reliability and power, although they are more expensive. The main drawback of the lever control is insufficient self-locking - the gates can open under the influence of strong winds.
Consider the parameters that must be considered when choosing an electric drive for automatic swing gates:
- Drive power reserve. The drive should not work to the limit, in this mode, the automation will not stand for a long time and will fail. When calculating the required pulling force, it is necessary to take into account the dimensions of the wings (weight, width, thickness and height) and the ease of movement of the wings.
- Intensity of work. For private use, a gate with an intensity characteristic of 30% is suitable - this is about 27 opening / closing cycles per hour. For industrial facilities, this figure is not sufficient, and you need to use automation with better cooling of the gearbox and engine. Such gates will cost more, but their service life is many times longer.
Self-installation of automation for gates
Bearing poles for the installation of automation is best done in concrete or brick. An approximate arrangement of the elements of the automatic system is shown in the diagram.

We will analyze stepwise the installation of linear drive automation:
- Check for ease of leaf movement.
- Eliminate the possible causes of “tight” opening of the sash: skew column, frame, non-lubricated hinges, skew hinges when welding, etc.
- Weld the mounting plates to the support posts. If during the installation of pillars mortgages were withdrawn, then the plates are attached to them. It is advisable to adhere to the distances indicated in the instructions for a particular automatic system.
- Open the gate 90 °. Weld a second pair of brackets to the gate leaves (the distance between the centers of adjacent plates is about 700 mm).
- Drive for swing gates to manual mode using a plastic key.
- Lubricate the brass bushings and install the drive brackets on the mounting plates.

- After installing the actuators, check the leaf movement and the parallel movement of the actuators. The drive should go smoothly and smoothly.
- Attach the dowel control unit to the wall.
- According to the wiring diagram, connect the wires.
- On the board, you can set the operating time of the first leaf and the delay of the second (no more than 2 seconds), adjust the drive force.
- Upon request, the gates can be equipped with photocells and a signal lamp.


Swing gates can be made on their own, avoiding unnecessary costs, and the installation of modern automation, adapted to harsh climatic conditions, will make their operation more convenient and practical.
Stage 1 - installation of swing gate posts
As racks can be used:
- profile pipe. The choice of pipe cross-section is justified above in the “materials” section,
- concrete pillar - purchased or poured in place,
- brick or natural stone. The latter is used more for cladding due to its custom sizes,
- wooden beam (100x100).
Ways to install poles / racks:
 Ways to install gate posts - driving
The pipe can be driven to a depth of about one and a half meters
This installation method is the fastest, most profitable (no concrete costs), it is possible to replace the rack. The main thing, when arranging poles with this method is to maintain the level. This will avoid the skew of the gate.
Material prepared for the site www.moydomik.net
 Methods of installation of pillars - concreting with reinforcement and without reinforcing support pillar with concrete (concrete), i.e. make a kind of foundation for the foundation of the gate.
We will describe the second one, because the former requires brute force and suitable soil.
Installation of gate posts
- Dig a pit with an earth drill at least 1 meter deep. The diameter of the drill should be at least 200 mm, with a pipe cross section of 100x100.
Depth depends on the depth of soil freezing in the installation region. The width of the sides is determined by the quality of the soil and the dimensions of the supports (pipes, wood, concrete).
Concreted pillars must withstand within 7 days, no less. Concrete should solidify well. While concrete is solidifying, periodically wet it with water. Of course, cracks in such an insignificant area are not as dangerous as, for example, with cracks in the foundation of a house. But it is better to avoid them.
 Reinforcement of pillars for gates
For reliability, the racks need to be reinforced. And also, in advance, remove two or three reinforcing mortgages for attaching loops.
Installation location and appearance of swing gates
This is the starting point from which all work begins. Often the installation location has a direct impact on the appearance of the structure.
For example, you need to put a gate on the back yard, on the entrance to the garden or to fence the future construction site. Then both the material and the design will be as simplified as possible.
If it is the front gate or to the garage - then the costs will be higher.
Dimensions of swing gates
In the ideal case, the gates are made with a fence. However, if you, for example, have a hedge or you are expanding the passage and need a new gate, you should accurately measure the size.
It is important to measure the height and width of the opening for the gate. When measuring height, keep in mind that technical clearance is usually left at the bottom of the gate. Its value depends on the coverage of access roads. If you have asphalt, tile or concrete laid in the gate area, then 5-7 cm of clearance is enough. If the soil is not strengthened (grass grows), and the surface is not even, then about 10 cm. Technical clearance is also needed to reduce the wind load, in case the future gate is continuous, without ventilation gaps.
It is also necessary to provide for the presence of sufficient clearance between the wings. This will allow you to level the slight displacement of the racks.
Swing gate calculation
For the frame, which is shown in the diagram, the following material will be needed:
- profile pipe 60x40 - 22 meters - for the perimeter of the frame and jumpers. This pipe will be attached to the racks and hold the entire structure,
- profile pipe 40x20 - 15 meters - for the inner frame (perimeter reinforcement). Namely, the gate sheathing material will be attached to this pipe.
Typically, pipes are sold per meter, so it’s best to take the dimensions you need right away. Among other things, it will simplify your delivery.
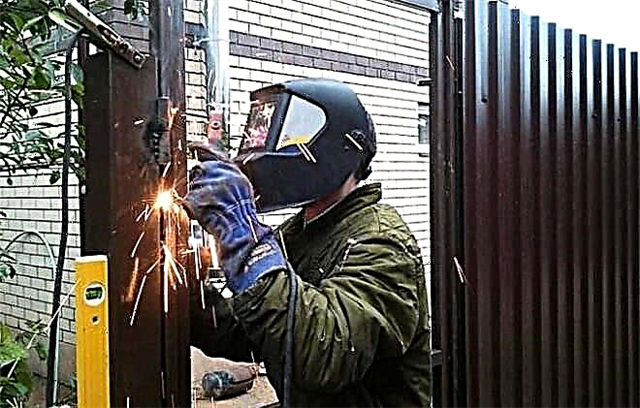
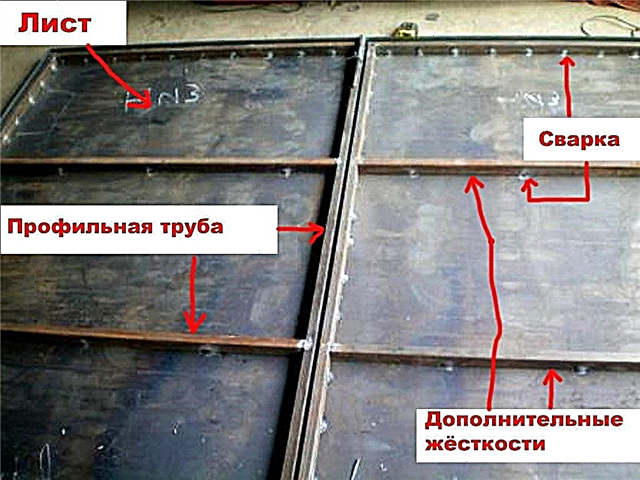
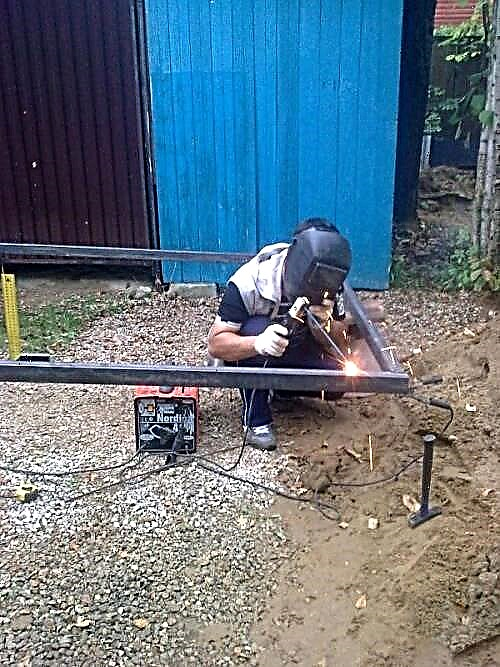
Swing Gate Welding
When carrying out welding work, remember melted safety precautions. It is better when this type of work is performed by a specialist. So the quality of welded joints will be higher. Yes, and the appearance is more beautiful.
When welding, it is important to make joints so as to protect the pipe from water leakage. Otherwise, water or snow will fall into it. In winter, it will freeze, and with warming it will begin to expand. This will inevitably lead to expansion of the pipe walls. And, as a result, to the deformation of the entire structure.
In our example, the inner pipes are welded in the form of squares. But this does not matter.
The step of welding fastening of the external and internal frame (pipes 60x40 and pipes 40x20) is 250-300 mm. Follow the checkerboard pattern. So pipes, with thermal expansion, will not tear the weld.
Some frame drawings for swing gates are shown below.

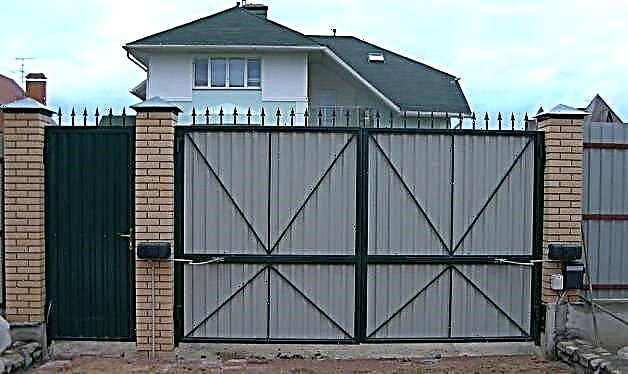 Swing gates with a gate (a real example)
 Stiffeners on automatic swing gates made of corrugated board
The more stiffening ribs, the greater the wind load your gates can withstand.
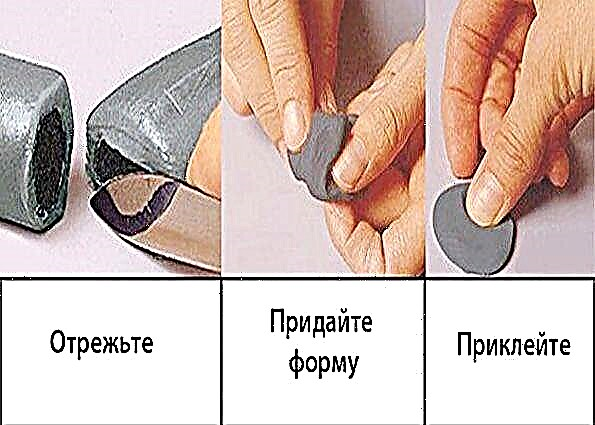
If you sew up the fence with decorative material, then weld the pipe in the middle of the outside. So, it is easier to indicate the place of fastening of the skin.
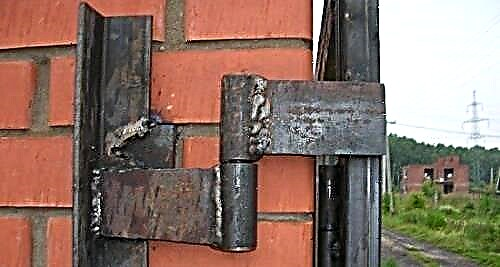
Gate valve and hinges for swing gates
 How to weld the hinges on the gate How to weld the hinges on the gate?
The hinges are welded to the frame and to the uprights (pillars). If the stand is made of brick, and the armature was not removed, then you must first attach the channel to the brick with a dowel, and then weld the loop.
Varieties of loops shown in the photo
 Hinge options for swing gates
  Types of hinges for swing gates
The valve mechanism is selected the one that you prefer. The most common and simple to manufacture is the one shown in the photo.
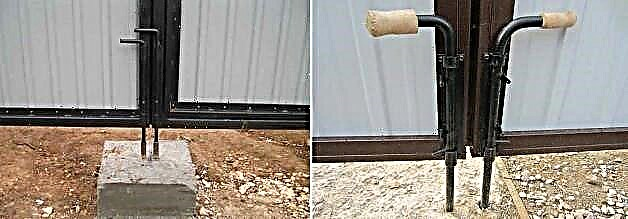 Gate valve for swing gates
Swing Gate Finish
- Carcass painting
Pre-wipe the frame from dust. Any color is suitable for coloring. It is better to apply the paint with a spray gun, so it will lie smoother, and the work will go faster. You can also use a brush. In this case, the process will be somewhat delayed, and the paint consumption will be less.
It is better to apply paint in several layers.
- Fixing the finishing material
Sheathing of gates is possible before and after installing the frame on the racks. To do this, we fasten the casing to the inner pipe (40x20, in our example). The method of fastening and fasteners depend on the finishing material.
Decking
Advantages - low price, wide range of colors, low weight. The disadvantages include: the complexity of the replacement (it is difficult to choose a color, because the sheet fades slightly, plus, the shade depends on the batch and manufacturer). And also, the ability to damage during installation and high windage.
Recommended a detailed description of how to make swing gates from corrugated board with your own hands
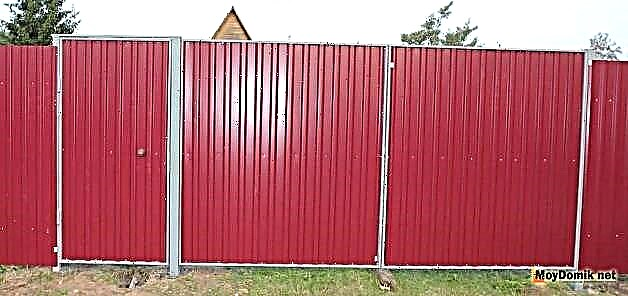 Swing gates made of corrugated board
Tree
Advantages - accessibility, beautiful appearance of natural wood, ease of replacement. Disadvantages - demanding care. Over time, the tree may dry out, leading to cracks.
 Wooden swing gates
Steel mesh
The advantage is low cost, high speed, low weight. The disadvantage is the low aesthetic properties, the transparency of the fence makes the entire territory of the courtyard accessible for viewing.
 Steel mesh swing gates
Combined
The basis of this combination is most often forged, which allows you to give the gate any shape. And closedness is given to them from the inside by wood, metal, corrugated board or polycarbonate. Examples of such gates in the photo
 Combined swing gates
Conclusion
We hope you are convinced that installing the swing gates with your own hands is a simple task. If there is material and a tool, the gate device will not take more than a week. From the moment you install the poles to the installation of the gate. And if you take into account that 7 days are needed for concrete columns to stand, then generally a day. I wish you success!
Swing gates - photos of different device options
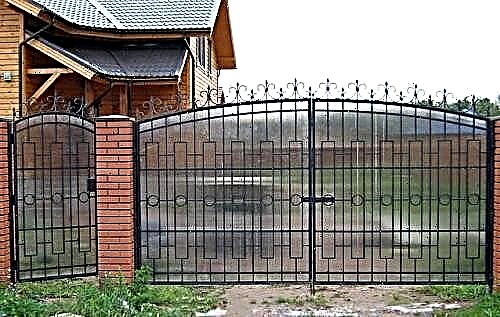
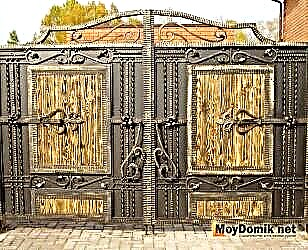 Metal swing gates - forged with wooden inserts
 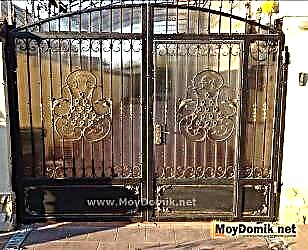 Combined swing gates - forging + polycarbonate
 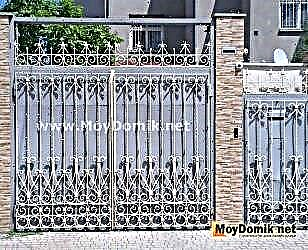 Iron swing gates with forged plates
  Simple swing gates for giving