Previously, such devices were installed in drinking establishments. But it so happened that at one point, she migrated to the kitchen and took root. The detail was extremely comfortable.

Over time, many types and functionalities have appeared that fit perfectly into the site of different sizes and shapes.
The classic consists of consoles installed at a meter height, and a table is already installed on them. The design is complemented by tall chairs.

The combined option is a worktop that combines a work and dining table. Its height is like that of the rest of the furniture.

Two-level ideal for small kitchens. At the top there is a rack, at the bottom is a dinner table.

The central one got the name from the location, as you find it in the center of the room. Advantages are that on one side there is a dining table, on the other a hob with a sink.

Mobile is able to combine a dining table and a desk, sometimes it can act as an ironing board. To save space, tubular ties are placed under the countertop at 21-26 cm. Easy to clean.

On the Internet there are a huge number of photos of bar counts, made independently.

How to cope with the task yourself?
How to make a bar yourself? In technical terms, there are no particular difficulties. The main thing is to choose the right option for your kitchen.


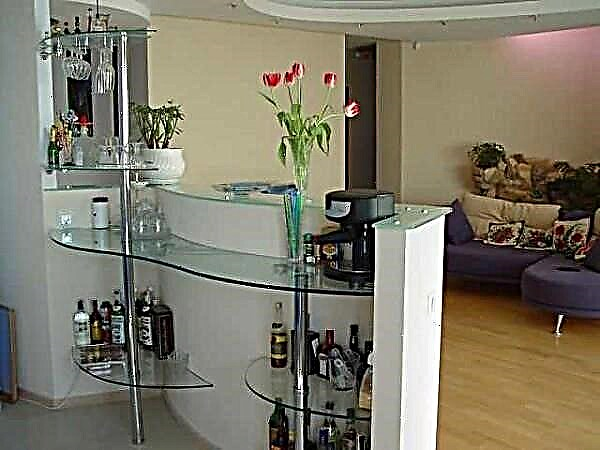
If the area allows, and you decide to make a full-fledged design, you will need to purchase the appropriate attributes. Various glass-wine-glass-wine-glass-holders shelf for juices, bottles and more.

It is installed with the emphasis of one edge on the wall or the edge of the kitchen. You can construct an island in the middle of free space.

In small spaces, it should be multifunctional. With its help, the kitchen area can be divided into zones. So you get a dining room, kitchen and dining table. The solution may be non-standard.

Medium sized kitchen
The video on how to make a bar counter on an area of 10-12 meters shows how to build a peninsula with a small ledge on the side. To use the space expediently, under the “barge” it is necessary to make shelves, a cabinet.

Where are racks more common?
As practice has shown, the bar is most often featured in studio apartments. And this is quite justified, because with its help it is possible to delimit the site into two zones. May continue to the desktop or peninsula.


Often it serves as a partition. Here the base comes from drywall, to which a surface is attached from above or from the side. As you can see, there are enough variations and you can choose the right one for your space.

Dimensions
If you decide to make a bar counter in the kitchen, then you know, there are no strict dimensional norms. The main recommendations are given only for height, width.

So, if the structure is from 1.10 m to 1.20 m, then high chairs will be needed near it. The minimum width is thirty centimeters, optimal from half a meter to sixty centimeters.

The shape, length and number of legs depends on your vision. Today, a platform on one pipe is already an irrelevant solution. Most often, you can see functional variations with cabinets, cabinets.
Appointment and types
If the kitchen area allows, the bar in the kitchen is set for its intended purpose: to sit down to have a cup of coffee or something stronger, to have a bite to eat. Then she also has the “equipment”: holders for glasses, wine glasses, glasses, next to the shelf / holders of juices, bottles, etc. They put it resting one edge on the wall or the edge of the kitchen, sometimes they are placed in the form of a skeleton - in the middle of the free zone.

Barna counter in the large kitchen
In small kitchens, it is often multifunctional. It can also be used as a separator into zones - the dining room and kitchen, in very small areas it is often used as a dining table. And it can be located non-standardly - against the wall.

Bar counter along the wall
In medium-sized kitchens - 10-12 meters - often performed in the form of a peninsula - a small ledge on the side. For a more rational use of space, a place under the countertop is taken up under shelves or a cabinet. This design is very simple - the countertop of the bar counter often rests on several pieces of straight or inclined pipes fixed to the cabinet table.

Bar counter in the kitchen - peninsula
Such multi-stage kitchens have recently become popular: it is more convenient to perform various operations in the kitchen on surfaces with different heights.

Two surfaces one above the other

The surface of the rack is slightly shifted relative to the table
But, nevertheless, more often the bar for the kitchen is present in studio apartments to distinguish between two zones: the kitchen from the living room or from the hallway - whoever has it combined. Moreover, it is often a continuation of the desktop-island or peninsula.

Bar counter for the kitchen as a continuation of the island table
They make it in the form of a partition. In this case, the base is most often made of drywall, and the surface is “attached” to it - from above or from the side.

Drywall partition wall
This option is easy to do.
In general, there are many options, variations and different types. Adapt the idea that you like under your conditions, and you can begin to implement it.
Dimensions and dimensions
There are no strict standards in this regard. There are some recommendations that are violated in about half the cases. Recommendations concern only the height and width of the countertop:
- The height of the bar counter is usually 1.1-1.2 meters. Then they put special high chairs near her.
- Width - minimum - 30 cm, optimally 50-60 cm. Less than 30 cm should not be done: even a small plate already on such a countertop will be in danger. And it’s just inconvenient: neither put your elbows, nor lean your elbows properly.
The length, shape, quantity and shape of the legs are all at your discretion. Speaking of legs. The traditional racks that were in the drinking establishments are the countertop on the pedestal. But for the kitchen, for some reason, a countertop on a single pipe from floor to ceiling is considered.

Something like this rack is considered a classic in kitchen sets
By the way, in this form it is practically not used. More functional counterparts with cabinets and cabinets prevail.
Bar counter for the kitchen: stages, manufacturing methods, photo reports
The simplest version to execute is the classic one: a countertop attached with one edge to a wall or furniture, and the other resting on a pipe. There are options with a countertop:
- Make from a wide board, preferably not coniferous - their wood is too soft.
- Order at the same company where they made the kitchen. If you bought ready-made, you will have to look for similar material in the photo or carry a small spare part with you in the workshops to demonstrate what you need.
- Make thick plywood, then decorate something - stick plastic, tile, mosaic.
Everything else is better to choose in a store selling furniture fittings. The choice is very wide, and the price range is generally amazing. For example, a pipe of the same diameter can cost three times as much. But such a difference is not without reason. From cheap Chinese pipes / nets / baskets, chrome plating begins to pour in cereal over time. The German hardware has a very high price tag, but a lifetime warranty, the Poles in the middle in terms of price and quality. The choice is yours.

Homemade bar counter for the kitchen from the board
In the photo above - a homemade bar counter, which was made from a thick board. It rests on one side on a shelf attached to the wall (also from inch boards). The second pillar is a traditional pipe. A hole of a suitable diameter is drilled under the pipe in the body of the countertop. Under the tabletop, a stop-nozzle “fixing ring” is installed on the pipe; the hole is closed with a decorative ring on top. There is also a “thrust bearing” or universal mounting of the pipe to the floor and ceiling, as well as various holders and shelves on it.
If the countertop is attached will be directly to the wall, corners are usually used for these purposes. You can take reinforced, and choose the color based on the finish. But this type of fastener is installed so that it is not visible - stepping back from the edge a few centimeters. You can put several small corners, or one solid.

Shelf holders can be placed under the countertop
If you decide to make a bar counter in the kitchen along the wall, you can use decorative shelf brackets. Their bearing capacity should be enough for the countertop, especially since you can put a few pieces. An example of assembling a bar counter with a simple design with a pipe in the photo below.
Photo report number 1: a home-made rack of countertops and pipes
The table top was cut out of the windowsill (solid wood), the edge was rounded, sanded, tinted and varnished. Spare parts - a bar leg, brackets and a fixator to the floor - were purchased in the furniture hardware department.

This is the source data.
We fasten the stop to the countertop, the corners to the edge. Sits down on self-tapping screws with a flat hat. Work takes about 7 minutes.

The main part is assembled
Putting the assembled stand against the wall, mark on the wall the places where it is necessary to install the dowels. We draw a marker on the floor with a marker: we’ll put a thrust bearing on this mark. According to the marks we mount the emphasis for the rack, put the wall plugs in the wall.

We put the rack in place, fasten with screws. Everything. Done.

Simple bar counter assembled by yourself
Bar counters with shelves
If you don’t like the design with the pipe, you can do without it, but you will have to remove the upper part, which is located under the ceiling. Instead of legs, for example, you can make the same shelf as near the wall. The view will immediately become more dynamic and modern.

Sketches of simple bars
And indeed the whole structure can be assembled from wide boards, joining them at right angles. Looking at the photo below, you will understand what it is about.

Bar counter for the kitchen in a modern style (for minimalism and hi-tech too)
Broken lines fit better into modern interiors. If the kitchen is in the style of minimalism or high-tech, then it’s hard to fit the classics there, but something consisting of broken lines will look very good (a few sketches in the picture below).

Art Nouveau bar counters
A slightly more traditional version is presented in the photo. From this, he did not become less interesting. A non-standard approach, even in small doses, significantly changes perception.

Variant of bar drains - tables
Bar counter on the base
All of this we considered options without reason. But the tabletop can be attached to some curbstone. If the countertop is exactly above the surface of the table, we take the pipe and standard fasteners to horizontal surfaces. If, as in this case, the surface of the bar is displaced, there is a special inclined fixture.

Attach the countertop to the cabinet - easy and simple
You can make a stand yourself. Actually, the main thing is to assemble the frame. It can be sheathed with furniture plywood or some other decorative material - it depends on the style of your kitchen. The frame can be made of wooden (dry) battens, or you can weld a metal corner.

On such a stand you can dance
As an option - to assemble from profiles for drywall, sheathe it with the same or GVL. Another option is to lay a brick base. But this, if the bearing capacity of the overlap allows.

With the basis of drywall: photo report No. 2
Often, a drywall foundation device is chosen. The material is inexpensive, the technology has been tested, the mechanics are familiar, the result - at least - is good. In the order of work, no news: we assemble the frame. In this case, wooden blocks were used, but in the same way it is also possible using profiles.

The main thing is to observe the verticality and horizontalness of the planes, put the racks exactly under 90 °. Everything is checked with a good construction level, verticality is best monitored by a plumb line: it has no error. When the frame is assembled, it is sheathed with gypsum board or gypsum plasterboard on both sides.

Drywall Sheets Mounted
Traces of self-tapping screws, corners and joints are puttied. Further, it depends on the type of finish chosen: some require puttying (water-based painting), while others do not. In our case, the textured paint was chosen, it is applied with a thick layer, and it is possible - directly on drywall.

Textured
It remains to establish a countertop on the bar counter. Choose which suits the rest of the furniture in your kitchen.
Photo report No. 3: Bar counter with sink
It was the first experience in creating furniture (and in general something worthwhile) with your own hands, as a result of which some design flaws were made. The design was not the most successful, although they don’t argue about tastes.
- inexpensive countertops bought on sale,
- the remains of a cabinet made of laminated chipboard,
- bars
- a couple of additional doors
- plumbing filling: sink, siphon, faucet and required pipes-hoses-fittings.

Worktops are folded with the letter “G”, connected by steel plates, sidewalls are attached
Countertops are laid out face down on the floor. They are connected in the form of the letter “G” with glue, with which the ends are smeared and a steel strip with perforation, into which screws are screwed. The strip, of course, is fixed from the bottom.
The sides were supposed to be ennobled (presumably with a laminate), because the remains of the household were used - an old door and a piece of a cupboard. They are bolted with the help of corners, aligned on the edge of the countertops. And this is the first mistake. And such a cabinet looks visually heavy, and sitting uncomfortable. The sides must be moved at least 10 cm from the edge.
After the sidewalls are installed, the curbstone is turned over, put on a permanent place. All other work was carried out in place. A hole was made for the sink, the plumbing part was installed and connected.

Front and back view
Slats are nailed on the floor - along the walls and slightly stepping back from the outer edge (5 cm indented, 10 can be more convenient), shelves are made. The cabinet on the washing side is closed by a door, the shelves on the left remain open. The space is partially finished with wooden planks.
At first they thought to put several different “gadgets” on the pipe, but the semicircular edges remained from the countertops. It was decided to use them on a pipe. As an external decoration of the curbstone, panels for decorating balconies (purchased in Leroy) were used. They almost fit in size, and covered the remaining slots with a twisted cord. As a result, a home-made bar counter with a cabinet for washing looks in the photo below.

Do-it-yourself bar counter for the kitchen
There are still comments on the finish. First, the cord will soon be saturated with various liquids, it will have a pale appearance and a strong “aroma”. To postpone the appearance of odors, it can be covered with something, even with the same PVA glue. The second - countertops are simply docked. Water will fall into the slot, various small debris will cram. Even at the “docking” stage, the edges must be smeared with sealant (transparent, silicone, not acrylic). It is also possible and necessary to process the edges of the cutout for washing. Then the countertop will not swell. The joints of the countertops can be trimmed with furniture plates, they can be used similarly or similarly instead of the cord. Another budget option - plastic corners and the same T-shaped strips.
Bar counter for the kitchen on the remains of the wall
If the kitchen is combined with a balcony, a piece of the wall remains. The place where there used to be a window.If there is no desire to destroy it, you can make a bar.

The rest of the wall when combining the kitchen and the balcony can be turned into a bar
There are two options:
- At the height that is, put a countertop. This will be another work surface or shelf. Above it, on pipes at an altitude of about 1.1-1.2 m, fix another plane, which will actually be a bar counter.
- Finish / grow the wall to the desired height and put the countertop.

How can I make a stand on the rest of the wall
Both options are not bad, but the one on the right is more practical: two surfaces in the kitchen are always better than one. Please note that the dimensions of the countertops are larger than the width of the “legs”. This is no coincidence: in this way you can more or less comfortably sit without turning sideways.
And if you are not too lazy to remove this wall, you can do something more convenient - so that you can put your legs. An example is in the photo.

So it will be more comfortable to sit
Photo Design Ideas


Desktop - as a basis

Photo of a bar in a small kitchen


As a basis for a coffee table

In the spacious kitchen))

Brick or stone bar counter - stylish

Custom look and color

Bar counter in studio apartment

You can have lunch

Two sketches for embodiment

Bar counter for a small kitchen
Related videos
If you want to place the bar counter in the open summer kitchen, you can borrow the idea in this video. A guy from snags and a thick board found in the forest built an interesting rack.
Most often, questions arise about how to make a countertop for a bar counter. You can trim it with mosaic. And how - see the video. In general, the technology of laying mosaics is simple: on a special white adhesive with subsequent grouting of the joints between the tiles. It is difficult to form an uneven edge. Here's how to do it - watch the video.
Bar counter in the apartment: purpose and types of construction
The choice of the type of such a design will depend entirely on the requirements that apply to it. Consider the main types of bar counters that you can mount yourself.
Wall construction. The tabletop is mounted along the wall, under it there are shelves for various little things. This type of bar counter saves free space and is used as a dining table.

Island option. The countertop is mounted in the middle of the kitchen. It can be used as a dining or work area. The option is applicable only in large kitchens.
Peninsula. This stand is a L-shaped (less often U-shaped) countertop, one of the long sides of which adjoins the wall and is used as a work surface. The rest can be used as a dining or buffet table.
Mobile view. In fact, this is not even a bar counter in the usual sense, but an elongated table on wheels, which can be placed anywhere, and then removed so as not to interfere. However, such a design has a right to exist. Such bar counters are used in small kitchens instead of a table.
The number of legs for a bar may vary. It all depends on the length and width of the countertop. For short bar counters, you can get by with one foot.
Bar counter in the kitchen: height from the floor and other optimal parameters
The dimensions of the bar counter depend on the dimensions of the room, however, there are certain generally accepted standards. The height is usually 1.1-1.3 m for free-standing bar counters designed for zoning rooms. If the countertop is adjacent to the headset, then it must match it. In this case, the height will be 85-90 cm. Most often, such racks serve as a dining or working area. There are bar counters for the smallest kitchens - 75 cm from the floor. They can be used as a full desktop.
The width of the bar for the kitchen should not be less than 30 cm. Otherwise, there is no question of any functionality. The best option would be a size of 80 cm, but with small dimensions of the kitchen you can reduce it to 55-60 cm.
 Wall bar, in which there is nothing superfluous
The length of the bar is calculated depending on the number of people who will be simultaneously behind it. For a comfortable location, one person should have at least 60 cm.
Making a bar in the loft style: what is required for this, step-by-step instructions for the production of work with photo examples
The bar counter in the loft style is more, nevertheless, applicable in cafe bars. That is why for step-by-step instructions we chose a similar room. For work you will need:
- solid wood board, 30-40 mm thick for countertops,
- boards, 10-15 mm thick for decoration,
- screwdriver, screws,
- grinder
- spray paint in cans,
- nails, hammer,
- PVA glue.
The base for the bar counter will be a support made of foam concrete, into which self-tapping screws are easily screwed. We will not dwell on the technology of laying foam blocks today - this is not difficult and it makes no sense to deviate from the topic.
Do-it-yourself bar counter: step-by-step instructions for making a loft-style structure
Consider all stages of work:
| Illustration | Action description |
 | On the base of foam blocks we fasten a wooden tabletop and ideally polish it. You can choose any shape of the future rack. Between themselves, the boards of the countertops are joined at an angle of 45 ° and glued with PVA. |
 | The cladding board is painted (any color can be chosen), and after drying it is superficially cleaned with a grinder. This action allows you to "expose" the structure of wood, make it clearly visible. |
 | On the base of the foam block we fasten the slats on which the lining will be fixed. Reiki are fastened with self-tapping screws, which are quite easily screwed into the foam block. |
 | Using nails we fix the lining on the rails. Boards can be mounted evenly along the entire length, and the option of placing them in random order is possible - this will give clarity to the structure of the tree. |
 | Lastly, we cover the countertop with paint. In our case, black color is chosen (after all, this is a night bar), and for the house you can choose lighter tones. It is better to use auto enamel as a coating - it gives more shine. Finishing with varnish will not hurt. |
Helpful information! If you don’t want to do woodworking, you can buy a ready-made countertop for a bar counter or order it at any furniture workshop. Instead of the base of the foam block in the apartment, it makes sense to use LSTK (light steel thin-walled structures), which are sheathed with GCR.
Quite often, in apartments, as a basis for a bar counter, drywall with a light steel frame made of metal profiles is used, which is subsequently finished with various materials for a certain style. We will definitely talk about the technology of assembling the base from GKL today - we have no right to skip this topic, but first we will consider the option of making a bar counter for a house made of wood.
What you need to make a bar for a house made of wood
For work it is necessary to prepare:
- beam 50 × 50 mm for mounting the frame,
- polished board or MDF panels for cladding,
- screws, screwdriver, elbow,
- drill, hammer, nails, hacksaw,
- polished board, 40-50 mm thick for countertops,
- furniture lacquer.
Step-by-step instructions for creating a wooden bar counter for home
We will study step-by-step instructions with a photo:
| Illustration | Action description |
 | The first thing to do is to assemble the frame of the structure. When doing this work, be careful with the angles - they must be exactly 90 °, otherwise the stand will be curved. For convenience, it is better to use a square. |
 | Facing can be made of any material. In our case, it is plywood. Pay attention to the marked box - this element is optional and serves, rather, for aesthetics than for practical purposes. |
 | Having cut and laid the countertop in place, we close its ends with decorative slats. Instead, you can use aluminum or plastic linings, sold in stores furniture fittings or household goods. |
 | Now you should carefully sand all surfaces and corners. We draw along them with our hands - no joints should be felt. Next, we clean the surface of dust, treat it with an antiseptic and fire fighting compound. After complete drying, we cover all surfaces with furniture varnish. |
 | For aesthetics, we fill decorative strips around the perimeter. Previously, they can be coated with stain, which will add contrast. It is also possible to paint the strips in a color suitable for the interior of the room. |
As you can see, such work will not be very difficult, but it will require attention and accuracy from the home master.
How to make a bar stand out of drywall with your own hands: some tips for beginners
The algorithm of actions is almost identical to the previous option. As a material for the frame, you can use a bar, however, to facilitate the design, it is better to perform it from a thin-walled metal profile. The tool will be needed the same as in the previous case, with the exception of the hammer and nails - here they will not be of any use.
All work is carried out similarly to the manufacture of a bar from a tree, so it makes no sense to dwell on the step-by-step instructions. We will only say that subsequently, after facing the frame with drywall, any materials can be used for finishing, whether it is simple or decorative plaster, PVC panels or any paints.
Making a bar counter in an apartment made of stone: difficulties and nuances
If we are talking about natural stone, then we can not do without difficulties. Certain knowledge and skills are needed here. Today, many replace natural stone with artificial stone, which looks no worse, but it is much lighter and cheaper. In order to make such a bar counter, it will be necessary to lay out the support from the foam block, similarly to the first option described in today's article. Then, using cement mortar or special glue, the base is faced with stone.
The tabletop will have to be ordered or purchased finished - it is unlikely that any of our readers has their own workshop for processing marble or granite. The marble countertop is considered the most practical - the stone does not scratch, practically does not get dirty, but the dirt that appears is easily erased with a simple rag.
Important! If you decide to install a stone bar, pay attention to the floors. If a wooden coating is laid, it will have to be taken apart - the wood may not support the weight of the massive structure.
Bar counter for small-sized kitchen: folding design and its own manufacture
If there is very little space in the kitchen, you can make a bar, which will be laid out as necessary, and then cleaned, which will free up useful area. Now let's figure out how to make it.
Often there are home craftsmen who expect to make such a design adjacent to the wall with a narrow side. We will say right away that if one person is sitting at such a counter, then this is possible, but no more. After all, its length in this case does not work out more than a meter. That is why the abutment is performed only on the long side. The only possible way will be in which the countertop will not fall, but rise to the wall.
The algorithm of the work and the necessary material
To make such a design, you will need:
- articulated hinges along the length of the countertop,
- hinge pipe with a seat on the wall,
- mounting level
- countertop (the easier it is, the better).
Choose a place along the wall, convenient for the location of the countertops. We measure the necessary height from the floor and draw a horizontal line using the mounting level, on which we fasten the hinge loops. Their second part is fixed with screws from the end of the countertop along the long side. From below, closer to the outer edge, we fasten the stop pipe on the hinge. Now, having laid the level on the countertop, we find a perfectly horizontal position and mark on the wall or floor under the counter the installation site of the seat for the stop. Fixing it in place, we can consider the work finished.


Now that the Dear Reader has figured out in general terms the possibility of making various types of bar counters with your own hands, we suggest that you familiarize yourself with photo examples of finished structures.
Examples of bar counters in the interior of a studio, home, cafe
The examples below will help a novice home foreman who is just thinking about making a bar counter to decide on his style. Also, the appearance of the structures can lead to any thoughts. All presented bar counters are made by home craftsmen on their own.
Do-it-yourself bar counters in apartments, studios and cafes:


Bar counters for the kitchen: photo examples of designs with prices
Not everyone has the time or desire to independently carry out all the work on the manufacture of such structures at home. We offer you to get acquainted with examples of ready-made bar counters, which can be purchased. All prices are as of October 2018.
Bar counter "Dorset (150)"nut. It is characterized by minimalism, but its cost suggests otherwise. You can buy a similar design at a price of 15 500 rubles.

Beautiful bar counter "Andrea", which is suitable for the "Retro" style. The length of the structure is almost one and a half meters, width 51 cm. Glass is used for the countertop. The cost of this product is 32,700 rubles, and the master will have to collect it himself. Although you can pay 3000 rubles for the assembly. and experts will do it.

Another option for the style of "Retro" - Gordian Classic with dimensions 100 × 100 × 60 cm. Made of natural pine. On the inside there are shelves - minibar. Cost - 20 500 rubles. It is possible to order an identical oak bar, but in this case the cost rises to 50,000 rubles.

Looking at the cost of the presented models, you involuntarily begin to think: is it not better to spend not too much time and make a bar counter for your apartment yourself?
To summarize
The bar in the apartment is a relatively new trend, which means you can always come up with something unusual, original. I always want the apartment not to be like the others. Remember that in such a work, everything is limited only by the flight of your imagination. The main thing is that there is enough strength and means to bring the idea to life. Indeed, only in this case the home master will feel satisfaction from the work done, and the bar counter made by him will not only be an aesthetic moment in decorating the interior, but will also bring practical benefits in saving space.
The table top made of whole logs is “aerobatics”:


We hope that the information presented in today's article was useful to our Dear Reader. Despite the fact that we tried to convey it as fully as possible, you may have any questions during the familiarization. In this case, you can ask them in the discussions below. The editors of Homius.ru will be happy to answer them as soon as possible.
Did you make the bar in the apartment yourself? Then we kindly ask you to share your experience with beginner home masters, who are our readers. This will be very useful information. Write, ask, share. And we finally offer you to watch a short, but rather informative and instructive video on today's topic.
DIY bar counter features
Typically, the bar is located a little higher above the floor than the usual table. If you make a product about one meter high, it will be much easier for you to purchase separately high chairs. Do not forget about the size of the plumb in the manufacture of countertops.

Original bar counter with chairs in the interior.
A mandatory attribute of a bar counter is a cabinet, which is located in the upper part. It usually serves the following purposes:
- Keep spilled liquids away from clothing
- ensure correct posture
- gives a modern look.
Additional Information. A locker is an optional element of a bar counter, but it will help to add a special atmosphere. There should be at least sixty centimeters to the bar. This will allow you to sit comfortably and not create additional discomfort. Railings are made of simple material, which is not very expensive. In the original models, they are usually made of metals, which significantly increases the cost of construction.

Bar counter in the interior of a modern kitchen.
To make the bar yourself, you should adhere to the above rules. It is also recommended that you familiarize yourself with the drawings for clarity.
What can a bar stand be made of?
You can make your own bar counter from various materials. You should not choose too bulky options. Most kitchens are small, so don't swing around during the construction process. It is recommended to opt for affordable models.
The most popular following materials for countertops:
- Plastic. The cheapest material that is not durable. On the market you can find various color schemes with a variety of prints. Perfectly fits into any environment.
- Particleboard, which is covered with a laminate. A more complex material for processing, which is characterized by high strength, reliability and durability. There are many different options. The coating imitates wood or marble.
- Drywall. Various sizes, shapes, styles are possible. Perfectly fits into country houses or modern apartments. It can be painted in any color, which is suitable for any interior.
- Tree. It looks beautiful and luxurious. The cost of the material differs depending on the type of wood. Making a tabletop with your own hands will be simple if you have minimal carpentry skills.

Do-it-yourself wooden bar counter.
Types of bar counters
Depending on the design features, the following types of products are distinguished.
- Stationary Maximum or minimum dimensions are possible depending on the needs. As seats, traditional bar stools are suitable. You can also add supports for legs, back, head.
- Combined. It is possible to supplement the basic design with a dining table, which fits perfectly into the ordinary kitchen. The height is usually slightly lower than the standard and reaches nine hundred centimeters. You can use a standard chair for sitting.
- Two-level. Also used in conjunction with a conventional kitchen table, which allows you to share the space in the kitchen. For example, one part will go into the kitchen, and the second - into the living room, which saves free space and allows you to effectively use the entire room.

Design of a two-level bar counter in the kitchen.
How to make a bar counter from a countertop?
The whole process goes through several key stages, including:
- preparation of materials and the creation of a general design scheme,
- the manufacture of the base to which the remaining elements will be attached,
- assembly and decoration.
Note! Particular attention should be paid to the manufacture of countertops. This is the main element, the quality of the whole product depends on the quality and stability of which. You can buy a finished countertop or make it yourself at will.

The countertop for the bar counter can be made of different materials.
Material selection
The most optimal options for use:
- Chipboard. The cheapest option. There are many different options for processing. It is very light, it can be varnished or painted. The main disadvantage is that chipboard sheets are sensitive to high humidity. Therefore, it is not recommended to use them in rooms where liquid can enter the surface. Buy only thick sheets of this material to increase their service life.
- Tree. Environmentally friendly material with an attractive appearance. Suitable for installation in almost any room. The cost of such structures is high, since natural wood is highly regarded among fans. It is required to carefully care for such a countertop. It is not recommended to put hot dishes in order not to damage the top layer.
- Glass. Such countertops look most elegant. They have an attractive appearance. The design is very fragile, which requires special attention when leaving. Scratches and small specks often remain on the surface, so it is worth using specialized tools to clean the surface.
- A rock. Both natural and artificial products are suitable. They are distinguished by high strength, reliability, pleasant appearance. Practically indestructible due to sturdy construction. The cost of natural stone is much higher than other materials. At home, it is almost impossible to process without special skills.
- Plastic. It features a large number of different color schemes. The most popular option on the market. It is characterized by simplicity in handling and care. Service life is short.

Bar counter frame.
Project creation
First you need to prepare a model and a drawing. The final complexity of the project, as well as the time spent on manufacturing, depends on which scheme will be selected, as well as materials.
Take measurements of the room in which you are going to make the installation. Be sure to consider the dimensions of other furniture in the kitchen in order to allocate space for placing countertops. The drawing will allow you to create a visual picture of what result you want to achieve.
You can use special applications for modeling. This will significantly simplify and automate the entire process. So you can consider the situation from all sides and choose the best option for yourself.

Before proceeding to the manufacture of a bar counter, you need to prepare a project.
Thus, the model will allow you to create an approximate sketch of what you want to get in the end. This is the most suitable option for oversized structures.
Manufacturing procedure
It is necessary to adhere to a certain procedure. First you need to build a countertop - the basic element that defines the design and functionality of the entire structure as a whole. It is recommended to choose the most durable materials that are easy to process at home.
Note! If you do not want to cut the countertop yourself, it is recommended to buy a finished product. It is sold in any specialized store at an affordable cost.
Some rules should be taken into account when erecting the foundation of the structure:
- You can make a brick base. For this, blocks from a special facing brick of red color are used. Such designs have durability, strength and high resistance to various adverse environmental factors.
- You can make a metal frame. This design is usually fixed to the furniture, which is located nearby, to provide the greatest strength.

In the manufacture of the bar you need to decide on the choice of material.
The work takes place in several stages:
- Taking measurements, creating diagrams, design. Selection of the optimal dimensions of the structure.
- The manufacture of the framework according to one of the methods described above.
- Frame processing.
- Installing countertops on the base.
- Production of additional shelves as desired.
- Adding various decorative elements.
Important! Please note that before starting any work, an initial drawing should be made. Only then proceed with the manufacture of the structure.
How to make a bar from drywall?
- Measure the basic design parameters. Consider the location of the countertops for ease of sitting.
- The frame is best made from metal blanks. For cutting, special scissors and self-tapping screws are used.
- Separately manufactured frames for the walls.
- The profile is fixed between each other with screws.

Do-it-yourself drywall bar counter.
Wooden bar counter
- Take measurements and mark the area for installation of the base according to the drawing.
- The bars are fixed strictly along the marking lines.
- Install tabletop supports.
- For the remaining fasteners, wooden bars are installed.
- After that, the countertop is installed.

Wooden bar in the interior.
Chipboard bar
The manufacturing process of the structure from chipboard does not differ from the previous options. You will need to erect a frame yourself, and you can purchase a finished countertop in a specialized market.

Bar counter from chipboard.
Bar counter lighting and related equipment
To ensure that the bar counter fits into the interior, you should choose the appropriate lighting area. It is recommended to use halogen lamps, which are placed on a special beam above the countertop. Also suitable are small shades that create an atmosphere of warmth and comfort.
Note! Use special equipment designed to adjust the light intensity. This allows you to create an individual design and atmosphere.

To illuminate the bar, you can use different ceiling lights.
What needs to be considered in work?
The bar counter is suitable for rooms in the style of minimalism, art deco, that is, where it is possible to create a special homely atmosphere. In almost any room, you can come up with the perfect combination of structural elements. The main thing is to think through every detail to the smallest detail in order to achieve the desired result.
Additional recommendations
During operation, consider the following:
- the height of the structure should not exceed one and a half meters,
- the best width is up to half a meter,
- use special fixing blocks for fastening,
- during installation, consider the place for the installation of lighting,
- you can order the countertop separately if the material for processing is difficult at home,
- do not choose the cheapest options.

The bar counter will fit perfectly into the art deco style kitchen design.
The bar counter will diversify your interior, make the room unusual and help save space. The process of manufacturing countertops is simple, but requires special attention.
Benefits
The use of a minibar in your home is not only an original design move. A similar idea, possessing positive qualities, will thereby help you solve a number of problems:
№ 1. Divide the kitchen into a place for cooking and a dining room, that is, a place where you will have lunch,
№ 2. In studio apartments, the counter can be a conditional section between the kitchen and the hallway. And if you choose the right colors, you don’t even need to tell guests about the existence of a border,
№ 3. An alternative to the table, in apartments with a small kitchen. It is also beneficial if no more than 2 people live in the apartment,
№ 4. By inviting friends to yourself, you will surely impress them. After all, this is a real decoration of the kitchen. Take a look at the bar counters with your own hands, the photos of which are presented below - the interior will inspire you.