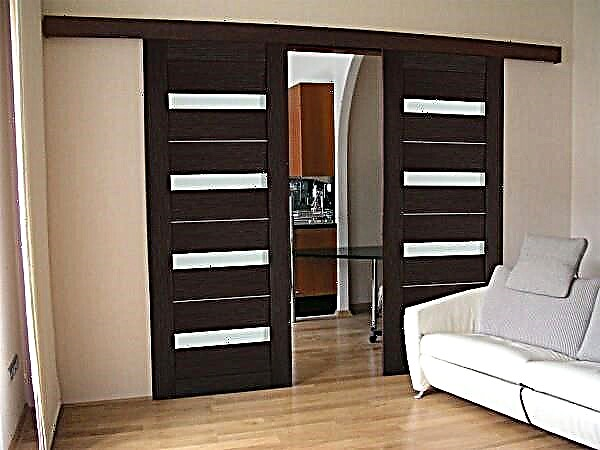
In his desire to make the house more comfortable and cozy, the idea often comes to replace conventional swing doors with sliding (they are also called sliding, sliding, hanging). The good news is that you can install sliding doors with your own hands without any problems. The bad thing is that a normal mechanism costs about the same as a quality canvas. What impresses them is the moment that in the open state they almost do not "eat" space. They either hide in the wall (the best, but more difficult to implement option), or move along it.
You can hang interior sliding doors yourself
All this is true, but there is a significant minus - a very low degree of sound insulation, especially in the version of the compartment door. When the canvas just covers the opening. When installing in a pencil case (wall), the situation is slightly better, but the degree of sound insulation of the swing door cannot be achieved even with this installation method. If all this does not scare you, you can study systems, choose, and then install.
Suspension system on top rail
A suspension mechanism is a load-bearing beam to which a guide is attached in the form of the letter “P” with “legs” bent inward. The rollers to which the door leaf is attached move along this guide. In technical terms, this is a hanging door on the top rail.

Principal arrangement of sliding interior doors on the top rail
When installing such a door, the floor under the door remains smooth, only the lower roller is installed on the right and / or left in the doorway. It slides along the groove made at the bottom of the canvas. It is necessary so that when moving it does not deviate vertically. This design is the easiest to install. Installation is very simple and consists of several steps:
- fasten the top rail,
- screw the roller mechanism to the upper end of the web,
- roll the canvas into the guide,
- install stoppers at the top (so that the doors do not fall out),
- having opened the doors, insert the lower roller into the groove, fix it on the floor.

Single-wing interior sliding doors
That's all. Doors on casters installed. But this system, in the form shown in the photo, has very low noise insulation characteristics. They are practically zero: the passage is simply blocked.
Rail sliding doors
This type of door has two rails: upper and lower. The rollers are also installed at the top and bottom. Thanks to this design, the system has a high degree of rigidity: it can be staggered, and it will not cause much damage.

Rail sliding doors
Less rails in the floor are known: the difficulty of cleaning. Garbage and dust constantly fall into the grooves, you have to monitor their cleanliness. This type of door is most often used in cabinets, walk-in closets. They are installed as interior doors if mobile children grow in the family. Then safety is more important than difficulties with cleaning.
Mounting options
Regardless of the sliding door system, installation methods can be:
- Sliding doors. Guides on which the canvas rolls are fixed on the wall.

Sliding doors. The guide is mounted on the wall above the right opening

Cassette sliding interior door: the canvas is hidden in a wall niche

Cascading sliding doors: one wing pulls another
The easiest installation option is coupe doors. They can be installed independently, and not only at the repair stage, but also after it. It is only important that the opening is smooth and the wall has normal bearing capacity. The disadvantage of such a system is that you can’t put anything close to the wall in the place where the door is rolled back. There is one more: very low sound insulation. The explanation is simple: if you look from the end, a gap of a few millimeters remains on the sides. It is necessary so that the canvas does not "shuffle" on the wall. And through it perfectly penetrate all sounds, becoming only a little quieter.
Cassette doors are good because in the open state the canvas is located in the wall niche and does not interfere. The second plus is that you can install gaskets around the perimeter of the opening, which give much higher sound insulation performance. Less installation of a sliding door in a niche - it can only be done at the repair stage. The second drawback: to make a pencil case under the sliding doors, they usually put a false wall, and these are stolen centimeters of the area.
Cascading - one of the varieties of compartment doors. It simply has a larger number of guides: according to the number of movable door leafs. Installation is perhaps the most difficult: a lot of parts and high installation accuracy is required. Systems belong to the elite category, and they rarely save on installation: repairs will cost more.
Self-installation of sliding interior sliding doors
Systems may vary slightly, but the general rules remain the same. There are several requirements that must be met before installation:
- The opening should be even, otherwise you will have to take the canvas, which with a margin covers all deviations.
- The bearing capacity of the sides of the doorway should be high, as well as the wall above it.
- The opening should already be finished: plastered and painted, papered or decorated with decorative panels.
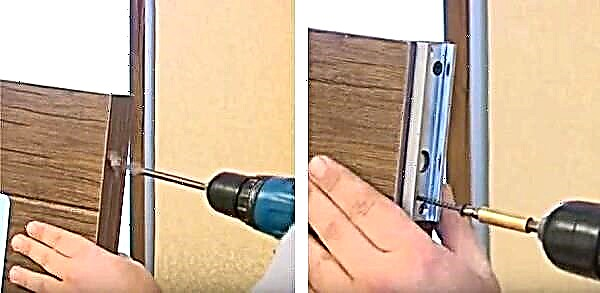
Next, proceed to the assembly. You can attach the clips first. Different manufacturers have their own recommendations. Some recommend 1/6 of the width of the door leaf to recede from the edge, in other systems they are attached immediately from the edge, and the mounting plates provide the indent. We install such a system: in it, the roller platforms are installed immediately from the corner.

Marking the location of the rollers
We center them, measuring so that the distances are the same. Having exposed the plate, with a pencil or marker, we outline the places for fasteners. In the marked places we drill holes. The diameter of the drill is 1 mm less than the diameter of the self-tapping screw.
Securing roller pads
We expose the plates, screw the screws. The length of the fastener depends on the weight of the canvas, but not less than 70 mm. We twist them exactly perpendicular, otherwise unnecessary stresses will arise.
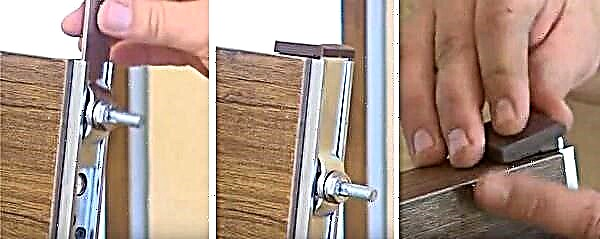
In the installed plates are inserted supports under the rollers. They are fixed by a lid on the side surface. Next, the roller platforms are screwed onto the threaded pins.

Roller platforms are screwed onto the pins
It is also convenient to install handles and locks before hanging. They need special, mortise. If you bought a ready-made kit, the required holes are available. If you have adapted a regular canvas, you have to draw a pencil around the outline, and remove the excess with a chisel. After the handle or lock enters the recess, mark the attachment points, drill holes for them and install fittings.

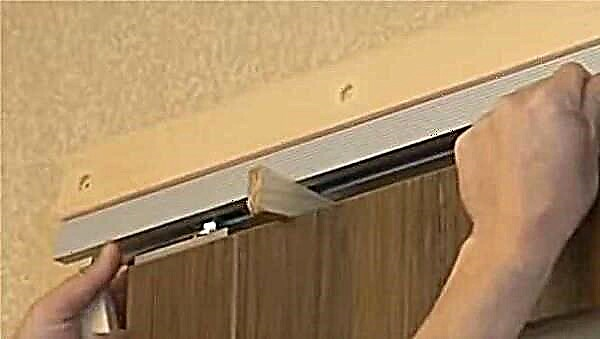
Then you can proceed with the installation of the guide. With mounted rollers, this will be easier: you know exactly at what height the lower edge of the rails should be.
The most convenient way is to hang sliding doors on a dry wooden beam. Its cross section is less than 50 * 70 mm, its length is twice the width of the door leaf + 5 cm. We cut the guide of the same length.

We measure the length of the carrier and mounting bar
Putting the guide along the bar, it is attached to the beam with screws with a length of at least 8 cm. The number of fasteners - at least three - 10 cm back from the edges and in the middle (more often, less often not).

Fastening the guide to the beam
Now you can measure at what height the timber should be fixed. On the door with the installed rollers “roll” a guide with a beam. So you can accurately note how high the doors turned out. We drill at least four holes for fastening to the wall in the side face of the beam.

The guide with a bar "roll" on the rollers on the door
To the obtained mark add 7-10 mm - the doors should hang, and not scuffle on the floor. 7 mm - the minimum clearance, which is sufficient if there are no floor coverings in the opening. If they are supposed (later to lay a laminate, carpet, linoleum, etc.), then the thickness of these coatings should also be taken into account.

Try on the doorway
To prevent the canvas from “walking” during installation, it is jammed with small wooden wedges. At least two stops are necessary - near both rollers.
Putting the beam on the wall and adjusting its position using the level, mark its position with a pencil. If the wall allows, you can fasten it to the wall through, but to do this, take screws with a length of at least 120 mm, and it is better to put it on anchor bolts.
If the wall, for example, concrete, requires the installation of dowels. For this, it is necessary to transfer the marks for the fasteners to the wall. This can be done with a thin and long drill, the diameter of which is smaller than the drilled hole.

Transfer marks to the wall with a thin drill
An even simpler option: a long thin nail. It is inserted into the hole and a couple of strokes mark the wall. The procedure is further known: we drill holes under the plugs for dowels, insert the plugs, if necessary, clogging them. Then mount the door.

We fix sliding doors on the wall
At the edges of the guide, it is necessary to fix the stoppers. They are started from the sides, empirically set the desired location (so that the blade covers the opening completely in the closed state, and rolls enough when opened. They are fixed with clamping screws.

Installing stoppers on sliding doors
Having opened the doors, we install a flag roller on the floor. He goes into the groove cut at the bottom of the canvas. It is necessary so that the doors do not deviate vertically.

Setting the flag roller
First, we insert it into the groove, mark the holes for the fasteners, drill, then fix it with short screws (length about 15-20 mm).

It looks like a set flag roller with open doors
On this we can assume that the sliding doors installed. They are already fully functional. Remaining finishing work. The mounting rail with the guide is closed with a decorative trim matched to the tone of the door leaf. It can be nailed with finish nails directly to the timber.

Decorative trim can be nailed directly to the beam
Only when you expose it, make sure that the wheels are closed. So much more beautiful)) Now - that's all, you installed the sliding doors with your own hands.
A video tutorial on installing such a door is shown below. There are several installation options.
We mount sliding doors of cassette type (in a pencil case)
The process of mounting the guide itself, hanging the door leaf almost one-on-one repeats the above. There is no need for finishing, but all other steps are necessary. Instead of mounting a decorative strip, a false wall is mounted at least 10 cm from the wall. Usually it is made of plasterboard profiles, which are sheathed with wall plasterboard. But this is not important - you can use GVL or plywood, any other suitable material.
Where does the distance of 10 cm come from? The door leaf thickness and the gaps on both sides are 5 cm. A minimum of 5 cm is added to them to install the profile. So it turns out 10 cm.
Since the main load will be on the wall, the frame of the profiles can not be strengthened. If such a wall does not seem very reliable to you, you can insert inside the wooden blocks, which are screwed with screws. This will make the structure very rigid.
See the video for the basic principles of calculating a case for a sliding door, as well as the layout features, the principles of preparing a doorway for installation.
Homemade Sliding Doors
Any door leaf can be mounted on rollers, and will work as a sliding door. The guide and all other components - rollers (bearing and flag), stoppers, stops - can be bought. Hang on them at least a piece of plywood or a door assembled from several boards. That will be the easiest and cheapest option. But to make a mechanism on your own is already a more difficult task. One of the options made from improvised materials of the sliding door mechanism (from round pipes of different diameters) in the video. The system was supposed to be installed in a wall cabinet, but judging by the design, even an oak solid wood door can easily withstand.
Types of Sliding Doors
The modern construction market offers a great variety of options for such doors. They differ in:
- size - can be standard and non-standard,
- shape - rectangular, arched, semicircular,
- the material from which the canvas is made - wood, metal, MDF, glass or their various combinations,
- functional device - parallel-sliding (sliding doors, cassette, radius, cascading) and sliding-folding (book and accordion).
Naturally, the price is also very different: from the most budget options to luxury ones, which not everyone can afford.
Let us dwell on the main mounting structures.
Sliding doors They are one or two wings that move parallel to the wall with a rail mount. It happens single-leaf and bivalve. In the second case, the canvas moves in different directions.

image from el-ab.ru
Cassette by the mechanism they repeat the previous view, with the difference that the canvas goes into a special niche in the wall. It is sold as part of a kit or is specially made, for example, from drywall. This option is very convenient from a functional and aesthetic point of view, but it can only be implemented at the repair stage.

image from www.syl.ru
Radius They have a semicircular shape and are suitable for the respective premises.
Cascading the doors consist of several panels, one of which is attached to the opening without the ability to move, and the next ones seem to go behind it, moving in one direction and gathering from the side of the fixed wing.

image from the site http://gutadesign.ru
Kinds "book"And"harmonic"Very similar to each other. They are a construction of several sections connected by special hinge loops. As a result, they can be folded according to the principle of a screen. This is a very compact design that saves space not only in front of the doorway, which is not the case with conventional swing doors, but also allows you to use the walls in full, which is not possible in the options described above.

image from www.optimalglaze.in
Advantages and disadvantages
When deciding to make sliding doors with your own hands, you must consider all the pros and cons of the selected system.
TO merits Undoubtedly, it is necessary to attribute the saving of usable space, which is especially significant in small-sized apartments. At the same time, thanks to the non-standard forms that many manufacturers offer, they can be used in very large openings. The durable materials from which the fastening mechanisms are made will allow this design to last for many years, and the fixed position of the blade makes it immune to drafts. It is also possible to automate the management process. And of course, such installations have high aesthetic data. In view of the wide assortment, it is possible to choose a model for any interior style, from classic to hi-tech.
Disadvantage such a solution is often poor heat and sound insulation due to the presence of gaps necessary for free sliding. In addition, although the space in front of the opening remains unoccupied, when choosing suspended structures it is often not possible to put furniture along the wall or hang shelves, as this will interfere with the movement of the web.For sliding models, special fittings are required, ordinary handles will not work. In addition, a good suspension mechanism or ordering custom sizes can be expensive.
Pros and cons of sliding systems
Sliding systems compare favorably with traditional swing doors both aesthetically and in their functionality. But behind the many advantages they have hidden a number of disadvantages. Of course, they cannot be called significant, but it is still worth considering when choosing one or another door system.
The main advantages of sliding door systems include:
- Significant space savings. These are their most important advantages. Such doors do not require additional space for opening; when open, they do not interfere with free passage. The arrangement of door mechanisms, as well as the movement of the panels, is carried out parallel to the wall, which makes such doors an optimal solution for small rooms,
- Safety and usability. Such a door will not slam from a sudden draft or careless movement. For me, this greatly reduces the likelihood of staying outside without keys in my pocket,
- Universality. Such structures can be used as entrance and interior rooms, or even as mobile partitions, necessary for the temporary delimitation of space.
In practice, literally any door can be made sliding - it is enough to replace traditional hinges with a slide and roller mechanism, and a standard lock with a special locking mechanism for compartment doors. Accordingly, canvases made of any material can be used as a basis: for example, I used OSB boards already known to you in my previous articles.

The main disadvantages of such door structures usually include:
- High cost compared to the price of traditional swing doors. A very controversial statement, especially if you do everything yourself and from improvised materials.
- The complexity of installation work. I did not notice anything too complicated to complete. Special or rare tools and equipment are not required, an assistant is also not needed - you can carry out the work yourself.
- Low level of heat and noise insulation of doors. This is due to the gaps both between two opposite canvases, so between the canvases and the doorway. But this problem is easily solved - below I will tell you how I slightly modernized the design, avoiding the penetration of cold air and dust through the doors.
- Noise when driving along rails. When using expensive high-quality mechanisms equipped with silicone tabs and special grease, the noise during the operation of the compartment doors is minimal. There are also ways to make silent the work of a self-made mechanism for compartment doors. In the future, I plan to use them.
- Need for skid care: cleaning and lubrication. However, the hinges of traditional swing doors also need to be lubricated periodically.
Having carefully weighed all the advantages and disadvantages of swing systems, I still decided to dwell on them. In addition, I had everything at hand for the manufacture of a sliding mechanism.
Features of the sliding mechanism for doors
Structurally, the sliding system is based on a roller mechanism with one or two carriages (depending on the number and stroke of door leafs). The rollers and the guide of this mechanism are usually made of durable and wear-resistant material. But I went further - I used closed bearings as rollers, and metal channels as guides, which made the entire structure literally timeless and practically maintenance-free.

The door design itself is quite simple and consists of:
- door roller mechanism
- door leafs. I also made them myself.
Interesting to know! For sliding mechanisms, special closers have been developed that provide smooth, independent closing of doors. They are installed quite simply and, in addition to closing, also provide for the fixation of door leaves in extreme positions.
Door mechanisms provide for the extension of the paintings in the opposite, and only in one direction. I chose the classic version, when 2 identical door leaves move towards and connect exactly in the middle of the doorway.

The basis of such doors is the upper guide: although their design provides for the use of two guides (top and bottom), the bottom is often not installed. But I preferred to put it - it not only positively affects the stability of the doors, but also serves as additional protection against drafts and moisture.
My option for manufacturing sliding systems
The process of self-manufacture and installation of doors with a sliding mechanism is quite simple and even a beginner can do. The main thing is to know how to handle the construction tool correctly and have general skills in installation work.
To install a stylish, practical and reliable entrance group with a sliding design, we need:
- screwdriver and drill. If you plan to install doors in a concrete opening, then take a puncher,
- a set of bits for screws,
- measuring tools: plumb, level and tape measure,
- nails and screws
- pencil,
- Saw on wood and metal. You can use both hand saws and take a grinder with a circular.
For the manufacture of paintings and the most sliding mechanism, I used:
- OSB sheets (the same ones that I used for cladding at home),
- wooden bars (I used them as a platform for mounting door fasteners),
- sealed bearings in a metal cage (4 pieces),
- bushings installed in the inner part of the bearing,
- bolts with washers and nuts,
- metal plates (4 pieces),
- as the upper guide I used the channel,
- the role of the lower guide is played by a wooden block.

I also used a narrow rail - I attached it to the edge of the door leaf in such a way that, when the doors were closed, it completely covered the gap between the leafs. Which also had a positive impact on draft protection.
The procedure for their installation is simple and consists of the following steps:
- Marking and cutting sheets of OSB. To make the cut place look as neat as possible, it is better to use a circular saw.
- Fastening to the top of the door leafs of a wooden block.
- Preparation of metal plates. They must be strictly the same size. A hole for a bolt is drilled on one side of the plates, and on the other, a lot of small holes for fixing screws.
Assembly of the roller mechanism. To do this, it is necessary to attach the plates to the wooden trim on the doors (2 plates per one sheet). Then fasten the bearings to the plate with bolts.

Installing the top rail. This is nothing complicated. The main thing, do not forget to use the construction level. Hanging doors and installing the lower guide. This is the final stage of installation.
As you can see, self-installation of sliding doors is a simple procedure. All work can be easily done with your own hands in one day.
Conclusion
A sliding entrance group is a great option for a country house or cottage. I hope that my material will help you to ennoble your own home and add uniqueness to it. Leave your comments and do not forget to subscribe to new articles.
Sincerely, Alexander!
Make a repost - win a laptop!
Every 1st and 15th day iBook.pro draws presents.
- Click on one of the social buttons. networks
- Get a personal coupon
- Win a LENOVO IdeaPad Laptop
LENOVO IdeaPad Intel Core i5, 8GB DDR4, SSD, Windows 10
Pros and Cons of a Sliding Door
Before using such an interior solution, you should familiarize yourself with the strengths and weaknesses of the sliding structures. Unfortunately, these products do not always guarantee the solution to all interior tasks. But making a sliding door with your own hands allows you to solve many problems.
Advantages of sliding doors:
- Space saving
- Sliding door will never close from drafts
- The doors open at the slightest effort
- Automation capability
- Lack of thresholds.
With a large number of pluses, there are significant disadvantages. If you make sliding interior doors with your own hands, and then install them and use, then this will immediately affect the heat and sound insulation.
In addition, such designs are not suitable as entrance doors. It will not be suitable for balconies or loggias. But if there is a wall of suitable length, then glass structures can be used. How to make such a sliding door with your own hands, you can watch the video.
Another minus is the cost of accessories. Prices for hardware are much higher than the cost of the same goods for ordinary doors. Cloths also have a higher cost. In the finished version of a factory or a famous brand, such a design can cost a lot of money. Therefore, it is very important to make a sliding interior door with your own hands.
Types of Sliding Systems
With all the variety of doors, the mechanism in them is the same, and the doors themselves can differ only in appearance.
There are several popular designs:
- Sliding doors
- Cascading models
- Harmonic,
- Multi-leaf systems,
- Radius systems.
Hardware
Unusual design involves such unusual fittings. If you are going to make sliding doors with your own hands, you need special locks, handles and other details. Handles and locks for these designs look unusual - the handles are recessed into the canvas. This is done so that when closing the canvas does not interfere.
By purchasing or making a sliding door with your own hands, the canvas can be equipped with all the necessary accessories or you will have to purchase everything separately. In the second case, it becomes necessary to perform an independent installation. When choosing, carefully examine the accessories.
How is the mechanism
These doors are called so thanks to another, not typical for urban apartments, method of opening and closing. Systems work by means of rollers that move along special guiding profiles. When planning to make a sliding door with your own hands, you need to take time to choose a mechanism that will fit the canvas. Also, the choice depends on the number of leaves, type of door.
The fact is that systems vary significantly in weight. Therefore, different weights - different loads on the entire system.
 Telescopic (cascading) sliding doors.
When installing some types of doors, it is necessary to take into account the number of rollers in order to correctly select the guides for them. For example, if you plan to make cascading sliding doors with your own hands, then you will need to prepare two mechanisms for each blade. The guide profile must have 2 gutters. It is also very important that for cascade structures, one gutter is required in the guide profile for each web.
Here's how to make sliding doors with your own hands. In the video you can see what mechanisms and accessories are used.
Manufacturing process
For starters, here's how to make sliding interior doors with your own hands. Watch the video - this video shows the whole process from beginning to end.
The first thing you need to go to the store for accessories and everything you need. But first you need to take measurements. It is very important to know exactly the width and height of the doorway and the door leaf. Knowing these parameters, you can not only without difficulty and confusion acquire everything you need to create sliding doors with your own hands.
 The mechanism of the sliding structure.
In a hardware store, the first thing to do is purchase a mechanism. The consultants will be able to choose the right option according to the size of the doorways and the door leaf. It should be noted that the length of the guides should be 2 times longer than the canvas. If the system is a little longer, it doesn’t matter. You can always trim the excess.
It is also worth thinking about the new door frame.
It may be necessary for her to purchase an additional rail. Also, before you make sliding doors with your own hands, usually they also acquire decorative trims, as well as persistent battens. If the task is to make a beautiful door, then you should choose a suitable one tightly.
Web preparation
For preparatory work, a milling cutter or grinder, drill, hammer and chisel are required. Which tool to choose is a matter of taste, but with the help of a power tool, preparatory work can be done more accurately and much faster.
On the lower end of the web, a groove is cut in the center. Its width should be 3 mm. It is needed for installation and operation of the guide. A more accurate groove is done using a milling cutter. In general, the creation of beautiful sliding doors with your own hands using only a hand tool is impossible.
Next, it's time to unpack the mechanism and find the rollers and staples in the package. First, the rollers are connected to the brackets. On the latter, special holes are provided for this.  The resulting nodes are attached to the upper end part of the cavity and outlines the contours of the parts. Further, on the same end part, grooves equal to the thickness of the fastening part of the bracket are selected. Then, the part is screwed to the body of the canvas. In the simplest version without a lock, you can consider a sliding interior door with your own hands ready.
At the next stage of work, a castle is installed. For work, the same manual milling cutter is used. The installation location is marked. 900 mm are measured from the bottom of the web. There will be a pen. The lock is embedded in the center of the canvas. The length of the castle is divided in half. The length of the castle is laid off from the place where the handle will be. This is done in two directions from the center. Further - at this point they make a niche for the castle. Then the lock is inserted and secured with screws.
Professionals recommend carefully marking the canvas before making a sliding door with their own hands. If the layout is incorrect, you can ruin the door irreversibly. If door handles are needed, then grooves or a through hole are also cut out for them. Making a hole is much simpler and cheaper.
Installation of the mechanism, installation of the door
Installation of the sliding system is simple. If you do not know how to make a sliding door with your own hands, then even in this case installation will not be difficult. All that is needed is the installation of the guide profile strictly horizontally.
The edge of the guide profile must protrude 50 mm from the edge of the opening. On the other hand, the profile must go to the width of the door leaf. The installation height of the mechanism must be calculated. This size is made up of the height of the web and rollers, as well as the gap under the door.
The distance of the profile from the wall depends on the wall itself. If the wall is flat, then everything is very simple. If not too smooth, then the process of manufacturing and installing a sliding interior door with your own hands may be slightly more complicated.
The canvas is installed on the rails on the side. After the door sits down, an emphasis is attached to the bottom. Now it remains only to equip the opening. Now you know how to make sliding doors with your own hands. It is not complicated, original and ergonomic.
Such doors are a new trend. Many designers use these solutions to create unique interiors. Such designs are also popular in Japan. You can decorate your home and expand your space. In addition, how to make a sliding door with your own hands is a very exciting experience.
Sliding door mechanism
Any such systems work on a similar principle.The movement is ensured by moving the rollers, which are installed on the canvas itself, along the guides that are attached to the wall, and sometimes to the floor. Schematically, it looks like this:

image from nash-remont.com
Moreover, the differences will be in the load that the mechanism is able to withstand, the number of structural parts, their location.
The mechanism can be suspended and rail. In the first case, one or more guides are used, which is attached only to the wall or ceiling, and the movement from below is controlled by an additional wheel.
With the rail mechanism, the running elements are installed both above and below the web, i.e. the lower wheel also moves along the rail. This provides greater structural stability, so it can be recommended for heavy doors. However, it is necessary to monitor the condition of the groove on the floor, regularly clean it and prevent dust and debris from entering.
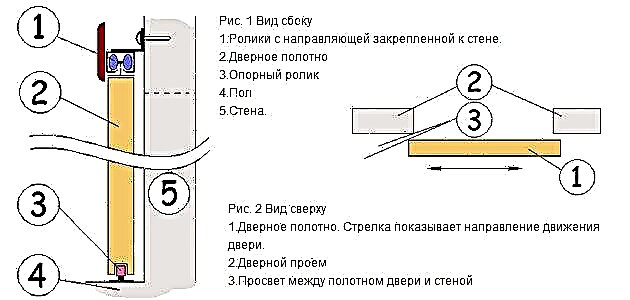
image from the site dverca.in.ua
Different materials have different weights; accordingly, a single-leaf MDF system will significantly differ from a double-winged glass system in this parameter. Based on these features, a certain number of sliding sets is selected.
When installing cascade structures, for each canvas, you must install your own guide.
How to make sliding doors with your own hands: step-by-step instructions
The store offers a wide selection of designs for every taste and wealth. Many of them are not at all difficult to install on their own. In order to make a sliding door to the room yourself, you need to clearly understand how and in what sequence to act.
To get started, you need to make sure that some requirements are met:
- the bearing capacity of the wall is sufficient to support the weight of the structure,
- the passage opening is even and does not have large deviations,
- the width of the wall allows you to completely roll back the canvas,
- the finish of this section is completed (except when cassette options are installed).
Next, you should determine the type of mechanism and purchase everything you need.
Let's consider how to make sliding interior doors ourselves using the example of a single-door coupe design.
For work you will need:
- sliding mechanism (rail guide, carriages with rollers, staples, clamps),
- platbands,
- screwdriver and screws,
- level,
- tape measure and pencil.
It must be remembered that the canvas should be slightly higher and wider than the opening to completely cover it, and the length of the guide is twice the width of the door.
With the help of the level, we determine how half is even, if there is a slope, it must be taken into account.
Choose the height at which the guide will be mounted. To do this, we apply the door to the wall in the opening and in the part where it will open according to plan. Mark the upper boundary with a pencil. We add 1.5-2 cm to this value for the indent from the floor and the height of the roller structure. If flooring is planned, its thickness must also be taken into account. Connect the points with a line, make sure its horizontality using the level.
We fix the guide according to the intended line. They may have some differences - some are attached directly to the wall with screws, some have brackets. For some, you will have to specifically fasten the rail. The main thing is that between the canvas and the wall there is a gap.
Install the roller mechanism. To do this, you need to assemble the carriages, insert the fixing screw into them and insert everything into the guide. We fasten the brackets to the canvas at a certain distance - some manufacturers recommend close to the edge, others advise to retreat 10 cm from the edge and 0.4-0.5 cm from the side faces. The number of carriages is determined by weight.
Now it's time to fix the canvas. It needs to be lifted, insert the screw into the brackets, locked in position. Help will be needed for this step - the system should be kept, especially if heavy materials are used. Tightening and unscrewing the screws, level the position.
Sometimes it’s more convenient to first install the roller system on the door, and start the rail later, when it is installed.
By means of clamping screws, the stoppers are strengthened. Their exact location is determined empirically. In this case, when closed, the web should completely cover the opening, but at the same time it is enough to roll back when opened.
Completing the installation of fittings and final finishing. Recall that for this installation special mortise handles are required. Locks need vertical. We decorate the slopes with platbands, the guide must be hidden behind the decorative strip.
Schematic drawings showing how to make sliding doors yourself, you can see in the photo below.

image from okeymaster.ru

image from the site prscomp.narod.ru
Of course, now you can buy special fasteners and canvases prepared specifically for these purposes in building materials stores. But if desired, a pendant door can be made from an old hinged door. At the same time, a metal cornice can be used as a guide rail. The movement will be provided by wheels screwed to the lower edge, and the position will be fixed by rings mounted on top.

image from basement-design.info
The option is very budget, but how much this design will be stable and durable, one can only guess. Even when using such a cloth, it is more reliable to purchase a special mounting mechanism.
Instead of a conclusion
False doors are very popular today. They look stylish and can add a twist to the interior. However, for all its advantages, there are some disadvantages to be reckoned with with this choice. To better understand how to make sliding interior doors yourself, watch the video below.
Tree
Solid wood is a fairly durable material that, if properly processed, can last a long time. After sawing into the required size lamellas, the wood must be impregnated with antiseptic agents, coated with a stain and varnished. The protective coating will have to be updated periodically. The disadvantages of natural wood species include sensitivity to high humidity.
Relatively cheap and not very durable material. Since it consists of sawdust compressed and glued together, the screws do not hold in it too tightly. The advantage of the material is its good heat and sound insulation, however, the design of the accordion door does not allow the material to display these qualities in its entirety. Particleboard also has high moisture resistance and bioresistance, but still for folding doors this is far from the best option.
Compared with chipboard, the material is more suitable for the manufacture of doors of complex design. Particleboard is strong enough, has a low weight, is environmentally safe, moisture resistant and fireproof.
Plastic
It is an inexpensive durable material with high water resistance. It is easy to process, does not give chips, scratches and cracks, does not dry out. For interior doors, plastic is usually used with a pattern: wood, wood, etc. An accordion door made of white plastic is more suitable as a partition for a shower cabin.
One of the most expensive materials used in the manufacture of folding doors is tempered glass. However, the process of its processing is quite time-consuming, so it will be quite difficult to make accordion doors with your own hands from this material, in which case it is better to purchase a finished product.
What tools will be needed for installation?
When buying an accordion door, you will definitely get a kit with the necessary spare parts for its installation. You will find step-by-step instructions and a detailed diagram of the fastening of individual parts. Be sure to study all the theoretical material in order to correctly, quickly and without problems assemble the accordion door.
Then prepare the necessary tools.
These include:
- Drill to create holes in the walls.
- Puncher - in case the doorway has to be expanded.
- Construction level and plumb - for perfect accuracy.
- Roulette and a special corner to clearly and evenly set the necessary markings.
- Foam - to fill the space between the extensions and the wall.
- Hacksaw to trim parts.
- Miter box (a special carpentry tray designed to cut boards) - for more convenient work.
- Wooden bars and platbands - as needed.
- We proceed to the preparation of the doorway.
The preparation of the opening is the very first and most important stage in the process of mounting a door-book. There are two options: either install the door in an existing box, or completely dismantle the old structure and replace it with a new one.
Another option is to completely replace the box. To do this, you must remove the old door frame, as well as carefully knock down the old mortar so that only the concrete wall remains. Only then can we proceed to installing the box. To do this, measure the length and width of the door leaf and opening. If the aperture needs to be increased, use a puncher, and to reduce it you will need handy extensions and timber prepared in advance.
Then proceed to assembling the frame for the structure. It is made taking into account the parameters of the door and the opening. Then fasten it with special screws, wedge it with bars and fix it with anchors. This must be done at three points - on each side of the structure. If the width of the canvas exceeds one meter, then you will have to add the upper fixation in one or two places.
What types exist
Accordion doors are divided into two groups:
- deaf
- with inserts from another material.
The first option is more reliable, which means it will last much longer. The design with inserts is not so strong. Deaf products are made from a solid array. If a hole is provided in the web, the structure is weakened. A folding accordion door is more often represented by a single-wing version. It is easy to operate, does not take up much space when folded.
There are also bivalve counterparts. They are installed in wide openings. The service life of such door leafs is short, because a large number of parts of the leaf are operated, which quickly leads to wear of the mechanism. The kitchen door is always single-winged, and, for example, when entering the dressing room or living room, you can install a double-leaf structure.
Door installation: installation of the sliding mechanism and its connection with the door leaf
The sliding mechanism is installed quite simply - all that is required here is to fix the guide profile in accordance with the level of the horizon and the location of the doorway. Here you can highlight just a couple of nuances.
- The edge of the guide should protrude on one side of the opening by 50mm. On the other side of the opening (from the one into which the web will open) the profile should go exactly the width of the web. This moment must be calculated and trimmed, if necessary, the door guide.
- Installation height of the sliding mechanism - calculations are also needed here. This installation size is made up of two components - this is the height of the door leaf along with the rollers inclusive and the gap under the door is 10-20 mm (depending on the curvature of the floor).
- The installation itself, or rather the distance of the guide from the wall. Here again, everything depends on the curvature of the walls - if they are even, then the guide without any additions is attached directly to the wall through holes pre-drilled in it. If the wall is curved, you may need to move the guide away from it by a certain distance - in this case, the wooden rail is first attached to the wall, and only then the guide is fixed on it.
You can clearly see the installation process of a sliding door in this video.
The door leaf is installed on the guide quite simply - the rollers are inserted into it from the side. After the door has reached the required position, you will need to attach a stop to the floor, under which we chose a long groove from the bottom of the door leaf. We open the door to the maximum so that they do not fly out, inside the guide with a metal screw, first we fasten the rubber cushion, which is the limiter, and then we put the stop in the lower groove of the canvas and fasten it to the floor with dowels on one side. Now we shift the canvas towards the closing side, select its desired position and first fasten the upper limit stop of the canvas, and then finally fix the floor stop with two more dowels.
Sliding door installation diagram
In conclusion, I will say a few words about the design of the opening itself - without this stage of work, the installation of sliding interior doors would be incomplete. From the rail 10-20 mm thick and the width corresponding to the thickness of the wall, some kind of door frame is twisted, which is mounted in the opening with the help of mounting foam. When the polyurethane sealant dries, platbands are installed on both sides of the box. If you plan to install a door with a lock, then instead of one of the platbands, a thrust beam with a groove for the blade is placed. In the same persistent bar, the counterpart of the castle is also mounted.
That's all. It remains to add only that the opening itself can be designed in different ways, and a wooden rail is not a panacea. For example, a laminate looks good enough in this place (it is also mounted on foam), and a harmoniously selected natural stone or ordinary tile looks quite good too. In general, there is something to think about, and the choice of materials for the design of the opening depends solely on your preferences.
Sliding Door Mechanism - Sliding Systems
As you can see, the main difference between sliding doors from swing doors,
is the mechanism of their functioning, which determines the options for movement
doors.
Thus, a sliding mechanism for interior doors
may be:
1. Intra-wall (hidden mechanism). As follows from
names, such a mechanism involves the movement of the door into the wall. System
such doors should be realized at the stage of wall construction, because
that there is free space in the wall - a pencil case for a sliding door.
Consequently, the wall becomes thicker by the width of the pencil case. This slightly reduces
usable area, but the walls are freed, near which you can install
furniture, hang pictures or put flowers.
2. External (open mechanism). This sliding system for
doors can be installed at any time, because does not require
rebuilding the wall. In this case, the door moves along the guides along the wall.
Therefore, you need to leave free space on one or two sides of the wall (in
depending on the number of valves and the direction of their movement).
Open (external) mechanism for sliding doors
It is worth noting that the door movement options, with external
the mechanism is quite a lot (see diagram). What allows you to choose the best
method for a particular room
Particularly noteworthy are sliding
four-leaf doors. Here the inner doors open in
side of external
What is especially important when you need to close a wide doorway
or a niche. Sliding door motion options
Sliding door motion options
The benefits of a screen door
Modern door designs are distinguished by their functionality and practicality. The mechanism of the door-screen consists of structures that are folded and connected by hinges and hinges.Such doors do not fold open, which significantly saves space in the room.
A very important point - the right choice of hardware - it must be of high quality, otherwise problems with opening and closing doors cannot be avoided. This type of design has its advantages and disadvantages.
Before buying or building such doors, it is important to decide for yourself which doors and materials to choose for them, to calculate the pros and cons
Screen door saves space indoors
- Space saving
- Convenient zoning of rooms,
- Relatively cheap cost
- Static
- Noiselessness.
This design can be easily manufactured and installed independently - which will save money on its purchase. Among the shortcomings, it can be noted that the design is not very strong, when compared with ordinary doors. With careless handling, it can quickly become unusable. Such doors are usually made of not very dense material, which suggests that it does not protect against the penetration of extraneous sounds.
Sliding door mechanism
Regardless of the type of sliding interior doors, the principle of operation of their mechanisms does not differ significantly. Rollers are mounted on the canvas, which, moving along the guides, provide movement of the wings.
The guides are usually attached to the wall, but in some cases are fixed on the floor. In the case of frame door options, a separate running element must be installed on each section.
Schematic illustration of the mechanism of sliding structures.
Sliding door devices are divided into pendant and rail. In the case of the suspension mechanism, the chassis, one or more, is installed only on top of the structure, and an additional roller is fixed below to ensure easy movement.
The rail mechanism looks the same, but the running elements are attached both from above and below the door frame, that is, the lower roller does not move along the floor, but along the rail mounted in it. This design is more resistant to heavy loads, so it is suitable for door models with large dimensions.
In order for the device to work smoothly, it is necessary to carefully ensure that dirt does not accumulate on the lower rail and debris does not enter.
Mounting Features
Installing a door book is not particularly difficult. It is necessary to purchase high-quality fittings, which will provide reliability to the folding mechanism. The concept of accessories includes such elements as: guide rails, door supports, hinges, handles, clips and clips, sealing materials.
The selection of the above elements must be approached with particular care. The door book is purchased by a large number of consumers who leave various reviews about purchases - you should carefully study them before buying.
In addition, it is recommended to clarify the opinion of the installer, who from his own experience can determine the quality and reliability of materials. Most problems arise due to poor-quality fittings.
How to install the door book can be seen in the video below.
Installation of the door of the book can be done by yourself. For this, panels with a width of about 300 mm are used., Selected based on the size of the doorway. The panels are attached to each other by hinges, and along the outer edges are attached to the door jamb.
Scheme of the mechanism of the door-book.
On top of the door jamb is mounted a guide made of sheet steel, after which the rollers are installed in the profile. Do-it-yourself door book, with proper installation, may look no worse than the factory
Particular attention should be paid to the thoroughness of measurements and the verification of the operability of all mechanisms. With the right approach, it’s not difficult to install a door book
So, the option under consideration is an excellent solution for saving space in the room. In addition, the installation process can be minimized by making the door a book with your own hands. Studying the types, options, materials and features of installing doors will undoubtedly bring invaluable benefits in their selection and installation, which will allow you to equip the interior in the best way.
Necessary components
The compartment door, like any other design, consists of special elements. In order to install it, you must purchase accessories. The selection of necessary parts depends on the type of sliding system and the type of door leaf. The door leaf may be integral and consist of one material, or may consist of several materials. Regardless of the materials used, any prefabricated sheet (sash) consists of profiles that are different in size and purpose. The frame has upper, lower, two side and intermediate (the number depends on the components) profiles.
The upper horizontal profile consists of two grooves. The lower part of the groove holds the material, and the upper with a round groove is designed to screw in a self-tapping screw holding the vertical profile of the door. The lower horizontal profile, like the upper one, consists of two grooves, but its lower part has longer side walls designed to hide the rollers.
The horizontal intermediate profile consists of two identical grooves. It is used as a link between materials. Vertical profiles perform not only a supporting function and have a special groove for supporting the material, but are also necessary for driving the sash. This element is made in the shape of a pen and has various modifications.
To set the doors in motion, a set of guides and rollers are needed. To maintain the direction of movement of the sash, a pair of asymmetric rollers are used, which are installed in the upper part of the sash and located at different ends of the frame. In the lower part, a pair of rollers is similarly mounted. They are the main driving force, they account for the weight of all the materials used.
Without guides, the movement of the wings is impossible. They are usually included in the kit two pieces: the upper and lower. They differ in form and purpose. The structure of the upper profile depends on the type of system. If the upper supporting sliding system is used, then a closed profile consisting of one groove is used. But most often, the lower support system is used to install the compartment door and therefore the profile shape has a slightly different look.
It consists of two grooves of the same shape and depth. Thanks to him, the door moves in a given direction. The lower guide is designed for the movement of the rollers and is a profile consisting of 3 grooves. Each pair of rollers has its own groove (narrow). The middle wide groove performs a dividing function.
What materials are used to make accordion doors
Manufacturers have in their arsenal a huge selection of materials for creating different types of structures. The most commonly used materials are MDF, plastic, wood or chipboard.
The cherry color model is versatile
Strong, environmentally friendly and reliable materials include wood. Products made from natural materials have a higher cost. For interior wooden doors, accordion is used chipboard. In this case, the coating is made of laminate or veneer. Lamination protects against resins. Such material is made from different types of wood and has a beautiful texture.
Another material for creating door structures is MDF fiberboard. It is characterized by moisture resistance, durability and wear resistance. Plastic, which is characterized by an affordable price and does not form cracks, is popular.
Ultra-modern interior decorates a fuchsia product
Stylish glass doors
Often, designers use the design of glass accordion doors. A variety of ornaments, matting and tinting are used as decor. Glass is framed by metal or wooden lamellas.
Cloths of glass models are connected by especially durable fittings
Designs are made using mirrors with unusual processing methods:
- facet consists of engraving and polishing the glass surface,
- fusing is a way to create stained glass.
Glass models ideal for terraces and verandas
Design of sliding interior doors accordion
The accordion is made of vertical panels that are connected with special loops. Products consist of three to four sections, but additional panels may be present if the design has non-standard dimensions.
Doors with an accordion design are suitable not only for standard doorways
When making a room, the dimensions of the accordion doors matter. Installing a similar design allows you not to think about placing objects in the room. According to the type of construction, the doors can be glazed, blind or with stained-glass windows. A variety of color palettes and design solutions can complement any interior design.
Such doors are used in any room: hallways, bedrooms, nurseries and living rooms.
Similar models look great as a complement to wardrobes
When arranging a room, you can use the following designs:
Simple accordion model
Slim model accordion for the living room
Disadvantages
Alas, not only certain advantages are indisputable. The disadvantages of sliding doors are also obvious:
- Fragility. Like any prefabricated design with movable elements, a sliding door has a shorter service life than a swing door. But if you reduce the operating load on such doors and install high-quality hardware with your own hands, you can somewhat extend their life.
- Insufficient noise and heat insulation. Through the docking slots of the panels, noise penetrates more easily than through a solid door leaf. Warmly sliding doors also hold worse. If you install them in the kitchen, they are unlikely to fully prevent the penetration of odors from it into the living area. But it is still possible to separate the kitchen area with the help of folding doors.
But as a design that saves space, the sliding accordion door in the kitchen fully justifies itself: in small apartments, the kitchen is often the smallest room.
How to assemble an accordion door: instructions are provided by the manufacturer
To understand how to assemble an accordion door, you should carefully study the instructions enclosed by the manufacturer. It details the process. Most often, the assembly is performed in the following sequence:
- we insert an axis into every second panel. If the manufacturer did not provide for landing holes, we form them yourself,
- place the panels in the desired sequence. If a pattern is to be formed on the leaf, the previous point should be carried out taking into account this particularity,
- mark the places for the installation of loops. Hardware should be fixed in three places at equal distances,
- we connect the panels into a single system, providing a gap of 3 mm between adjacent elements,
- install the door handle of the appropriate type.
The sequence of panels should be observed.
Installation of an interior door-accordion: sequence of actions
Installation work is carried out in the following sequence:
- the old door system is dismantled,
- the sizes are removed
- preparing a doorway,
- going box without a lower threshold. Fastens in a doorway,
- guides are mounted. For their fastening, either self-tapping screws or clips are used,
- installation of interior doors accordion side, on which the rollers are fixed, in the guide profile. After the sash takes the space allotted to it, side profiles are installed.