From the point of view of aesthetics and practicality, a standard metal fence on the balcony - has no value, because it does not differ in high decorativeness and does not protect the balcony from bad weather. The only purpose that it regularly serves is insurance that protects the owners of the apartment from falling from a height. It is possible to increase the functionality of the fence by lining it with siding - a material intended for exterior decoration.
Why sheathe a balcony with siding
Windows and balconies are open to the public, and this is a good reason to ennoble their appearance. If the interior of the apartment can be hidden from the eyes of passers-by, then on the exterior of the balcony you can easily determine the social status of the family and its design tastes.
There are four reasons to clad the exterior of the balcony with siding:
- Creating a continuous coating that protects the interior of the balcony from prying eyes,
- Protect the balcony from the penetration of rain, snow, wind and cold,
- Insulate the balcony,
- Create a decorative covering, improving the appearance of the outer part of the balcony.
Cladding with siding is usually carried out in conjunction with the glazing of a balcony or loggia. First, siding panels are mounted, after which wooden, metal-plastic frames with double-glazed windows are installed. You can make the cladding without subsequent glazing. In this case, the goal is only one - to update the outside of the balcony, to make it more attractive.

Which siding to choose for facing
All decorative materials for outdoor use have special requirements: they must be resistant to temperature extremes, ultraviolet radiation and waterproof. Vinyl and metal siding panels meet these requirements. For facing the balcony more often choose vinyl siding. There are several reasons for this:
| Metal siding | Vinyl siding |
| Contact with sharp objects leaves scratches that begin to rust after getting wet | Scratches do not affect the quality of the material. |
| Large material weight, increased load on the fence | Much lighter than metal |
| It burns out faster in the sun | The painting is not superficial, the paint is a component that is part of the material for making siding, it burns out less |
| The panels are easy to wrinkle during transportation and installation; dents are difficult to straighten | After deformation, it quickly takes its original shape. |
| Smooth painted surface | In addition to the range of colors, there is a choice of textures: brick, stone, wood |
Of course, vinyl siding also has some disadvantages. For example, unlike metal, it cannot be painted. When melted under the influence of fire (vinyl does not burn) toxic fumes are released that are harmful to humans. In this regard, metal panels are more advantageous, since they do not burn and do not melt.

If the balcony is located on the sunny side, it is better to choose a material of light colors, because a slight change in color, which occurred due to the action of sunlight, is less noticeable on it. When buying material, you should pay attention to the uniformity of the thickness of the vinyl. You can determine this by looking at the end of the panel. It is also recommended to slightly bend the panel, testing it for ductility.
Preparing the balcony for cladding
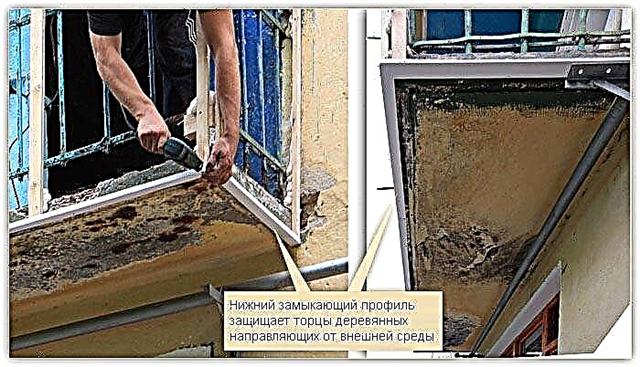
Since the siding will be attached to the fence, preparation begins with grid state analysis. If it is completely dilapidated and barely holds, it is better to dismantle it and replace it with a new one. With a satisfactory condition of the fence, it can be left and further strengthened by scalding with a metal strip. The railing is removed in any case, and if there is a decorative slate finish on the outside, it should also be dismantled along with the fasteners, cutting them off with a grinder.

The reinforced grill is cleaned of rust and paint residues with a metal brush, and covered with an anticorrosive agent or other rust preventing agent. After drying the anticorrosive, all metal parts are primed and painted. The balcony slab is also inspected, and the solution is knocked around the edge, which can interfere with the installation of the frame and siding panels. The loose crumbling cement screed is completely removed and a layer of waterproofing is laid with a small approach to the wall. After that, a wooden formwork is installed along the perimeter of the plate and a fresh screed is poured.
Installation of the lathing
The frame for attaching the siding is made of wooden blocks with a section of 40 by 60 cmpre-treated with an antiseptic agent against mold and woodworms. If insulation will be laid under the siding, the width of the bars should correspond to the thickness of the insulation material. 
Heater for siding:
- Mineral wool (semi-rigid in slabs),
- Fiberglass,
- Expanded polystyrene extruded,
- Basalt fiber.
First, vertical racks are mounted at the corners of the balcony and are attached to the fence with brackets. If the side panels on the balcony are made of concrete or brick, the bars are fastened with anchor bolts.

Further between the racks are installed horizontal bars along the slab and along the upper border of the fence. With vertical racks they are connected by metal corners and, for reliability, are attached to the fence with brackets. When the supporting part of the frame is ready, additional vertical jumpers are installed with an interval of 50 cm. The gap remaining between the plate and the lower beam is foamed with mounting foam.

At this stage, the insulation is mounted. It is laid between the vertical bars so that there are no gaps. The insulation is nailed to the posts, screwed on with screws or fixed with a construction stapler. The waterproofing is stretched from above (dense plastic film).

Mounting
The main stage of covering the balcony with siding is the installation of vinyl panels. It is carried out in the following sequence:
- Corner pieces are fixed at the corners, into which the ends of the panels will be wound,
- On the lower beam, located near the balcony slab, the starting bar is installed. They are attached to the bar with self-tapping screws,
- The first panel is inserted into the lock of the strap until it clicks, then it is slightly pulled up and fixed with screws to each vertical bar. Self-tapping screws are inserted into the mounting holes without violating the integrity of the panel. Having screwed the fastener all the way, it is loosened by turning back about ¼ turn,
- The panels are installed to the very top, and the last one is sized to fit, and is covered with a finish bar or corner.


During installation, the siding will have to be cut to size. This should be done with scissors or a jigsaw. It is not recommended to use a grinder for cutting, since it can melt the edge of the vinyl. If siding the balcony for the first time, It is recommended to start work from the side surfaces, because installing short sections of panels is easier to handle. Having gained little experience in facing the end faces, you can go to the facade of the balcony.

General installation errors
If siding is first performed, common mistakes are often made, which subsequently lead to deformation of the material, violation of fastenings, tearing off of the panels by wind and other defects. Experienced craftsmen are familiar with the nuances of installing siding, and can give practical recommendations.
Basic installation errors:
- The fastener is not in the center of the mounting hole, or not in the hole at all, but in the body of the panel. Right when it’s located in the central part of the groove,
- Siding panels are installed without gaps; there is no space left for thermal expansion of the material. That is why, after locking the lock, the panel should be pulled up and only then fixed with screws.
- Self-tapping screws press the panel too tightly. It’s correct when there is at least 2 mm of space between the panel and the fastener,
- Not enough clearance is made between the end of the panel and the inside of the corner piece. It should be less than 7 mm,
Safety precautions
The covering of the balcony on the ground floor does not present any particular difficulties - depending on the height of the basement, work can be carried out from the ground or from construction scaffolds. On the second floor, you can also use forests, but on the floors located above, you have to be careful. All work is carried out from inside the balcony., and you have to bend over the edge of the fence to install the lower panels. It is not recommended to do such work alone - need a partner, which will hedge during complex manipulations.
It is also likely that a tool that has fallen from a height, a siding trim or beam will injure people passing below. Even if the balcony is not located above the pedestrian zone, for the duration of the work it is better to enclose the space under it with a red ribbon. It’s even better to put at the bottom of a person who will warn people about the danger.
Types of siding for the balcony
First you need to figure out which siding on the balcony you can install. Several varieties of this material are on sale: metal, vinyl, wooden. There are also samples of ceramics, cement. Of all the above, only two are suitable for remote sites - metal, vinyl. They have suitable technical characteristics, have a long service life, are completely unpretentious to the conditions of use.

As for the wooden counterpart, its service life is too short for the balcony. Cement and ceramic types of material have significant weight, therefore they cannot be recommended for installation on external structures. They are used for finishing load-bearing walls, as well as for interior decoration of living rooms and industrial premises.

Benefits of siding
The material presented is considered one of the best used for facing the balcony. It has such undeniable advantages:
- Impact resistance. Siding easily withstands strong gusts of wind, falling ice, hail, small household items. Even if it bends, you can easily repair a damaged panel or replace it with another one.
- Resistance to corrosion.
- Good insulation performance. The presented material does not allow noise or moisture into the room.
- Safety for human health. The siding does not contain harmful impurities and can be used to decorate balconies of bedrooms and children's rooms.
- Easy to install. You can install such a cladding yourself.
- Durability. The material will not only last several decades, but also retain its original characteristics, including color, shape, volume.
- Low cost. Almost any family can afford such a facing.

Preparation for work
Like many other construction works, decorating the balcony with siding from the outside requires special preparation. As part of this, a person will need to take care of the purchase of necessary materials, preparation of tools, as well as primary processing of concrete slabs. Each of these steps needs to be considered in detail.
Necessary tools
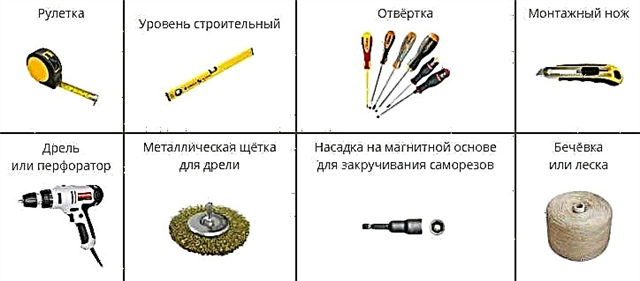
To trim the balcony with siding, you will need the following tools:
- roulette,
- construction level,
- screwdriver,
- drill or punch,
- assembly knife
- metal brush for a drill,
- a magnetic base for twisting screws
- rope or fishing line.
If you are going to work with standard self-tapping screws, you will need a 2 mm drill, as well as a magnetic nozzle. This will allow you to not lose fixing materials during operation.
Materials
To perform the work you need to purchase:
- Siding. Its amount is calculated for each specific case individually, based on measurements on the balcony itself. Experts recommend taking 15-20% more material "in reserve".
- Internal and external corners, which will close the side joints.
- Planks for installing siding, thanks to which sheets of material will be interconnected.
- Wooden bars 40x40. They are used for mounting battens for siding.
Also, for the work you need consumables: screws, anchors, brackets. They are also recommended to be bought with a margin, as some of these products may be lost.
Preparation stages
Immediately before the siding of the balcony, it is necessary to carry out such preparatory work:
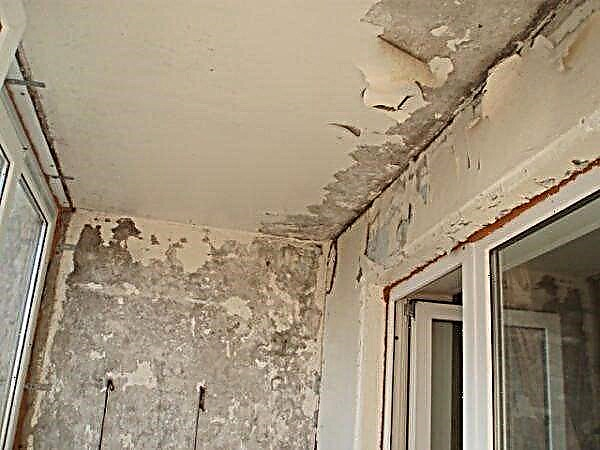
- Clean the ceiling of the balcony from old dirt, paint. Check their condition. If necessary, close the cracks, strengthen the floors.
- If there is serious damage, it is necessary to install a wooden crate on the balcony slab and pour it with concrete.
- Along the perimeter of the balcony, the metal crate must be cleaned of old paint and repainted.

Submitted works may take from several hours to several days. After their completion and complete drying of all the materials used, you can go directly to the installation of the finish.
How to sheathe a balcony with a siding outside

Doing the siding of the balcony outside with your own hands is carried out in several stages and is conditionally divided into the lining of the upper and lower horizontal belts, the design of corners and the installation of siding strips. Consider all the elements presented in more detail.
Installation of the crate
The presented works can be carried out on a previously prepared balcony area. They provide for the installation of horizontal and vertical bars, to which siding sheets will be attached in the future. Initially, the horizontal elements of the crate are mounted, and then the vertical ones.

Important! At the joints of the panels, gaps of about 5 mm must be left to prevent deformation of the plates when the temperature changes. For the same purpose, it is better to turn the screws back a quarter of a turn, in case of expansion of the material.
Covering: installation of the lower horizontal zone
The horizontal slats of the lathing are mounted to the balcony slab using the metal corners of the dowels. Between themselves the bars are additionally fastened with self-tapping screws. In that case, if the balcony grille is pressed closely to the stove, you can mount the crate on the lower part of the fence.

Sheathing: installation of the upper horizontal belt
Finishing the balcony with siding outside at this stage is carried out as follows:
- The installation height of the material from the balcony slab is measured.
- Using the building level, markup is created for the installation of the beam.
- The material of the desired length is selected around the perimeter of the parapet.
- The beam is installed on the parapet using dowels, screws.
After the completion of such work, the side battens of the crate are installed in increments of half a meter. At the joints put on two slats for reliable fixation of the material.
Covering corners
The corners are formed due to special L-shaped profiles. They are inserted between two corner bars of the crate and fixed with screws. These works begin when the crate is already mounted.
Balcony siding
In most cases, the interior decoration of the balcony with siding is carried out according to the same scheme as the external:
- Ceilings are cleaned of old finishing materials, restored.
- A crate of beams is installed (aluminum profiles can also be used for interior decoration).

- To the bottom of the crate, the starting bar is fastened with screws. The first siding panel and subsequent ones are attached to it.
- The work is completed by installing the finish bar.


Indoor siding panels can be installed in a few hours. Unlike external work, it does not require special skills from a person and can be used without safety equipment.
Useful Tips
So that the installation of siding does not cause you trouble, you need to follow these basic recommendations:
- Before starting work, make sure that the slab of your balcony is not skewed. If they are found, call the engineer - he must clarify whether it is possible to make paneling in your case.
- Do not attempt to repair large cracks in the floor. Refuse further work, as they can lead to a collapse.
- Do not use metal profiles for the outer crate, replace them with light bars. This will not create additional load on the remote structure.
- Work independently only on those objects that have a metal crate. Balconies with concrete fences cannot be individually sheathed - you need to order a team of industrial climbers.
- Before starting work, recount the material, make sure that you have everything with a margin. This will allow you to continue working if some part of the material is damaged or lost.
If there is such an opportunity, be sure to consult the selection of fasteners for cladding, finishing material with specialists. They will not only tell you which siding patterns are more suitable for you, but also help to calculate its amount for your object.
Common mistakes

When installing siding panels, these errors are most often made:
- Use non-galvanized fasteners. Such in the very first years of operation can rust.
- The panels are too tightly fixed with screws. Such an error leads to siding deformation.
- Do not leave allowances for thermal expansion. This also leads to deformation of the coating.
- Self-tapping screws are inserted into the body of the panel, and not into perforated allowances for installation.
All these errors lead to a reduction in the cladding service and can cause the owner of the apartment to change panels in a few years. Avoid the shortcomings presented, and the siding cover will serve you for many years.
Advantages and disadvantages of siding
If we talk about the positive aspects of this material, the following stand out especially:
- Resistance to the effects of fungi, mold, moisture, corrosion. Therefore, siding does not require the installation of a protective layer.
- Temperature exposure will not lead to deformation and cracking of the material.
- High mechanical strength.
- Absolute electrical inertia.
- Siding does not react with water.
- When wet or heated, the material does not emit substances harmful to human health.
- Covering the balcony with siding can last up to 20 years.
- A wide range that allows everyone to choose the right option.
- Simple and quick installation.
 A large assortment allows you to choose a siding for any requirements
The main disadvantage of this material is its exposure to high temperatures. At air temperatures above 50 degrees, it begins to fade and burn out. Because of what, siding can not be used to decorate balconies in hot countries. In addition, the product cannot be repaired, so if damaged, it will have to be replaced. The material is non-combustible, but is easy to melt.
Preparatory work
Do-it-yourself siding of the balcony begins with the preparatory phase. It includes the following actions:
- The railing and old cover on the balcony are being dismantled.
- The trimming of the holders of concrete panels is carried out by a grinder.
- All rods are inspected. If necessary, welding work is carried out to restore their integrity, the rusted metal is strengthened with a galvanized tape.
 Dismantling old plating and reinforcing metal rods
 Lower belt mounting
Selection of materials and installation work
Before you trim the balcony with your own siding, you should choose the materials. First of all, you need to choose a wooden beam for the crate. Its thickness should correspond to the thickness of the lower belt, the installation of which is described above. Some masters allow small deviations, but it is better to pre-purchase a beam of the same thickness.
Then you should choose the outdoor siding for the loggia. It is important to remember that these products cannot be installed end-to-end, so the dimensions of one front panel should be equal to the dimensions of the outer edge of the balcony railing plus the thickness of the crate, multiplied by 2, plus 70-100 mm of stock. Side panels are simpler: they are cut in length.
Exterior balcony siding also requires fasteners. In this case, ordinary wood screws with a corrosion-resistant coating are used.
Installation of a horizontal belt
At this stage, you will need to close the gaps between the rods. The first step is to install a side beam, which is simply pinned to the facade with nails. If you have carpentry skills and the appropriate tool, you can process the tree and connect it with a spike groove system.
Next, one after another, mount the wooden beam tightly to each other. To do this, carpentry glue is applied to the previously installed wooden base, and a beam is installed on top. The height of this layer of the crate should reach 8-9 cm.
In the same way, 2-3 rows of wooden boards are mounted on the installed beam, between which, if necessary, a heat-insulating layer and a moisture-proof membrane are laid. It is better to check each installed element with a building level so that subsequently you do not have to re-manufacture the structure. At the end, the verified wooden parts are removed, then to mount the siding on them.
Immediately before siding balconies on the outside, you should draw up the corners of the skeleton. For these purposes, the fittings that are supplied with the siding are used. First of all, it is necessary to take a segment of the clypeus and cut out the triangles in the center of its short side, which will play the role of the glides. Then this element is heated and bent at an angle of 90 degrees to make a corner. The resulting product is attached to the corners of the crate on the screws.
On a note! There should be a small gap between the siding panels, so it is not recommended to screw the screws completely. It is better to leave the wooden elements in the “walking position”, so that if the temperature rises, the plates can expand without deformation.
Wall and ceiling preparation
If you are planning to decorate the balcony with such material, then you will need to prepare the walls and ceiling a little, but the amount of work performed will be 2-3 times less than with any other material. Let us consider in more detail the process of fixing siding inside the balcony.
STEP 1 : remove old finishing materials and crate. If you had plaster, plastic panels, wallpaper, wood - it must be carefully removed and removed from the room, leaving only bare walls.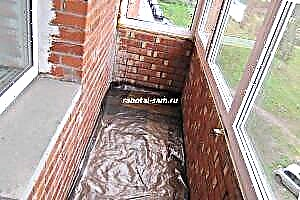
STEP 2: to dry. Often there is increased humidity on the balcony, and finishing the balcony with siding in such conditions is not recommended. We install the heating element for 1 day (heat gun, fan heater, and at least a hair dryer) and wait until all materials have dried. Choose dry weather.
STEP 3: install a heat insulator. The foil element must be greased with mastic, which is sold in the kit, and glued to the walls (foil into the room). Such material will not allow heat to leave the room, the balcony will be much warmer during the heating of the room.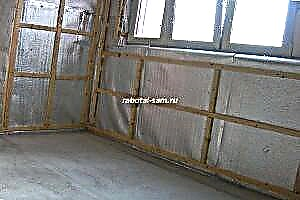
STEP 4: align the floor on the balcony. This can be done with a regular screed, pouring it according to the marks and measuring the level of the evenness of the floor. If you are ready to spend 2,000-3,000 rubles, then you can fill in the "liquid floor" of a well-known manufacturer - it is practically not necessary to level it, it takes the level itself, has increased elasticity. Be sure to fill in the film, which stacked under a vapor barrier - Additional protection in case the first layer is damaged.
Tip: before filling the screed, check the integrity of the base, if necessary, repair cracks and crevices, and also mark the level of the desired screed with a measuring tool (hydraulic or laser level), put markers. This will help level the floor.
The interior decoration of the balcony with siding can begin 20-30 days after the floor has dried and “walled up” the lower part of the insulator. If you start earlier, the worker can damage the integrity of the screed with his weight.
Install the crate
Finishing the balcony with your own siding is not so terrible as installing the lathing. 90% of all the mistakes made by beginners make at this stage. In fact, there is nothing complicated in the crate, you just need to know a few tricks that will help you not to "mess up" and do everything the first time around.
STEP 1: set vertical logs. Indoors, they are made of wood (45x45 mm wooden beam) - it is much easier to attach siding to it, it is easier to work with the material and process it. There are many ways to fasten a tree to concrete, but it is best to use anchor fasteners or liquid nails if it is not possible to plant on an anchor or dowels. The width between the logs is 60-70 cm. At the same time, you can install logs under the insulation on the floor to do everything in a complex.
STEP 2: level everything. This must be done not only in the vertical, but also in the horizontal plane. It is best to measure each wooden beam at the time of its installation, since then it will be difficult to change anything.
STEP 3: open the crate with anticorrosive material. Take 2 liters of wood impregnation, 300 grams of a paint product (mainly clear varnish), apply 1 coat of paint with a brush, wait 8 hours, then apply a second coat, wait 12 hours. Lastly, apply a layer of varnish. The tree will be reliably protected from corrosion and pests and will be able to withstand even constantly increased moisture.
Important: decorating the balcony with your own siding will be much easier if you first make the entire crate and install all the lags. Do not try to make 1 wall first, then trim it with siding and install the crate on another wall - there will be large gaps and braces in the corners. The first panel should go around the perimeter.
Even with such a volume of work, indoor siding decoration will be much cheaper than natural wood, ceramics or any other material. The average cost of 1 m 2 of siding is 180 rubles. The minimum price is 165 p for 1 m 2.
Balcony insulation
We will use mineral wool - the cheapest and most practical option, the cost of 1 m2 of mineral wool is from 30 rubles and above, depending on the thickness. Vata in 8 cm, which we will use, costs 50 rubles. We have a crate, logs, which are approximately 70 centimeters apart. This is the space we will fill.
We cut the sheets of mineral wool 50-60 centimeters wide, after which we carefully “insert” them between the lags. It is necessary to make pieces 2-3 cm longer than the distance between the lagsso that they stay in the opening on their own until the installation of siding. Work only with gloves and a respirator so that the material does not affect the respiratory system and does not cause skin irritation. You can take 2 times thinner slabs of wool and lay in 2 layers, overlapping joints - this will be a little more efficient.
We fix siding to the crate
On average, finishing inside the balcony with siding is done in a couple of hours, because you just need to screw the finished panels to the finished crate. You should get a screwdriver for comfortable work, since you will need to twist a lot. Consider the installation process in stages.
STEP 1 : screw the first lamella. This is the most important step, because the beauty of the wall will depend on how exactly you install it. It must be set clearly in level and measured several times.
STEP 2: install the first lamella on another wall and bring out an even angle with the first. Measure everything with a level in a horizontal plane. To connect, use a special internal corner for siding.
STEP 3: fasten the following overlapping siding lamellas. Each lamella has a “lock” on one side, in which holes are made for screwing to wooden lags. It is in them that the screws must be screwed. Each subsequent lamella will hide the previous mount.
Tip: do not try to screw the sections tightly, as the PVC material can "lead". Do not stretch the slats during installation, everything should be done with minimal effort, only then the wall will be perfectly smooth during operation and will not deform at the first load.
Finishing inside the balcony siding completed. If you follow the instructions, in a few hours you can become the proud owner of a beautiful and insulated balcony, which will always please you.
Comments: 2
When the thought came to somehow warm the balcony, otherwise it’s not possible to go there this winter, somehow I came across an option for siding inside. Polyurethane foam was taken as a heater, since the option is environmentally friendly and additional fasteners are not needed. And on top lay a ball of vapor barrier film. Plus it is also that sheathe siding is much cheaper than wood, and will not fade. You can hide all the cords and connections behind it and make it yourself easily, without calling people who would rip off the same amount of money.
First, I trimmed the balcony with ordinary plastic. It looks normal, but it is very flimsy. In the first week of operation, it was scratched by a dog, and after a while my children finished it off. Poked holes - in a word tore it to hell. I decided to sheathe the balcony with metal siding to avoid all problems. Now everything is OK!